This article is prepared by our Salesforce Architect Anastasia Posivets.

This is a common case when a customer wants you to integrate some system with Salesforce so that external data is displayed in Salesforce preferably the way the customer sees it with other Salesforce objects (layout, tab, list view, chatter, lookups to related records, reporting) and the customer (or you) is concerned about data storage. And in this case, you can suggest different approaches that have their own pros and cons.
A brief overview of some of the ways to integrate
1. You can use any ETL tool to copy data from one system to Salesforce and update back from Salesforce to another system. However, you have the same set of info that consumes data storage in Salesforce (of course except some standard objects that don’t consume data storage).
2. You can use the AppExchange package to connect the specified system and it’s already configured. However, there are no AppExchange packages for every external system, or it can be quite expensive.
3. You can collaborate with a team that is responsible for the particular external system and provide them at least the info about the standard Salesforce API to push information. However, not always you can collaborate with such a team.
4. You can develop some scheduler to retrieve information from the external system that won’t be real-time and will anyway consume Salesforce data storage.
5. And etc.
In case the Salesforce data storage really matters in your integration goals, you need a real-time synchronization of information between external systems and Salesforce, and you don’t want to consume data storage Þ External Data Source with External Objects can help you with it.
However, not every system supports OData protocol by default, but it can have a REST API to handle CRUD operations.
In this case you can implement a custom apex adapter.
You can read consideration related to custom apex adapter here.
In our use case we are going to integrate Toggl Track for time tracking with Salesforce in order to see Time Entries.
It has a REST API doc. Click here.
STEPS
#1. Configure Named credential
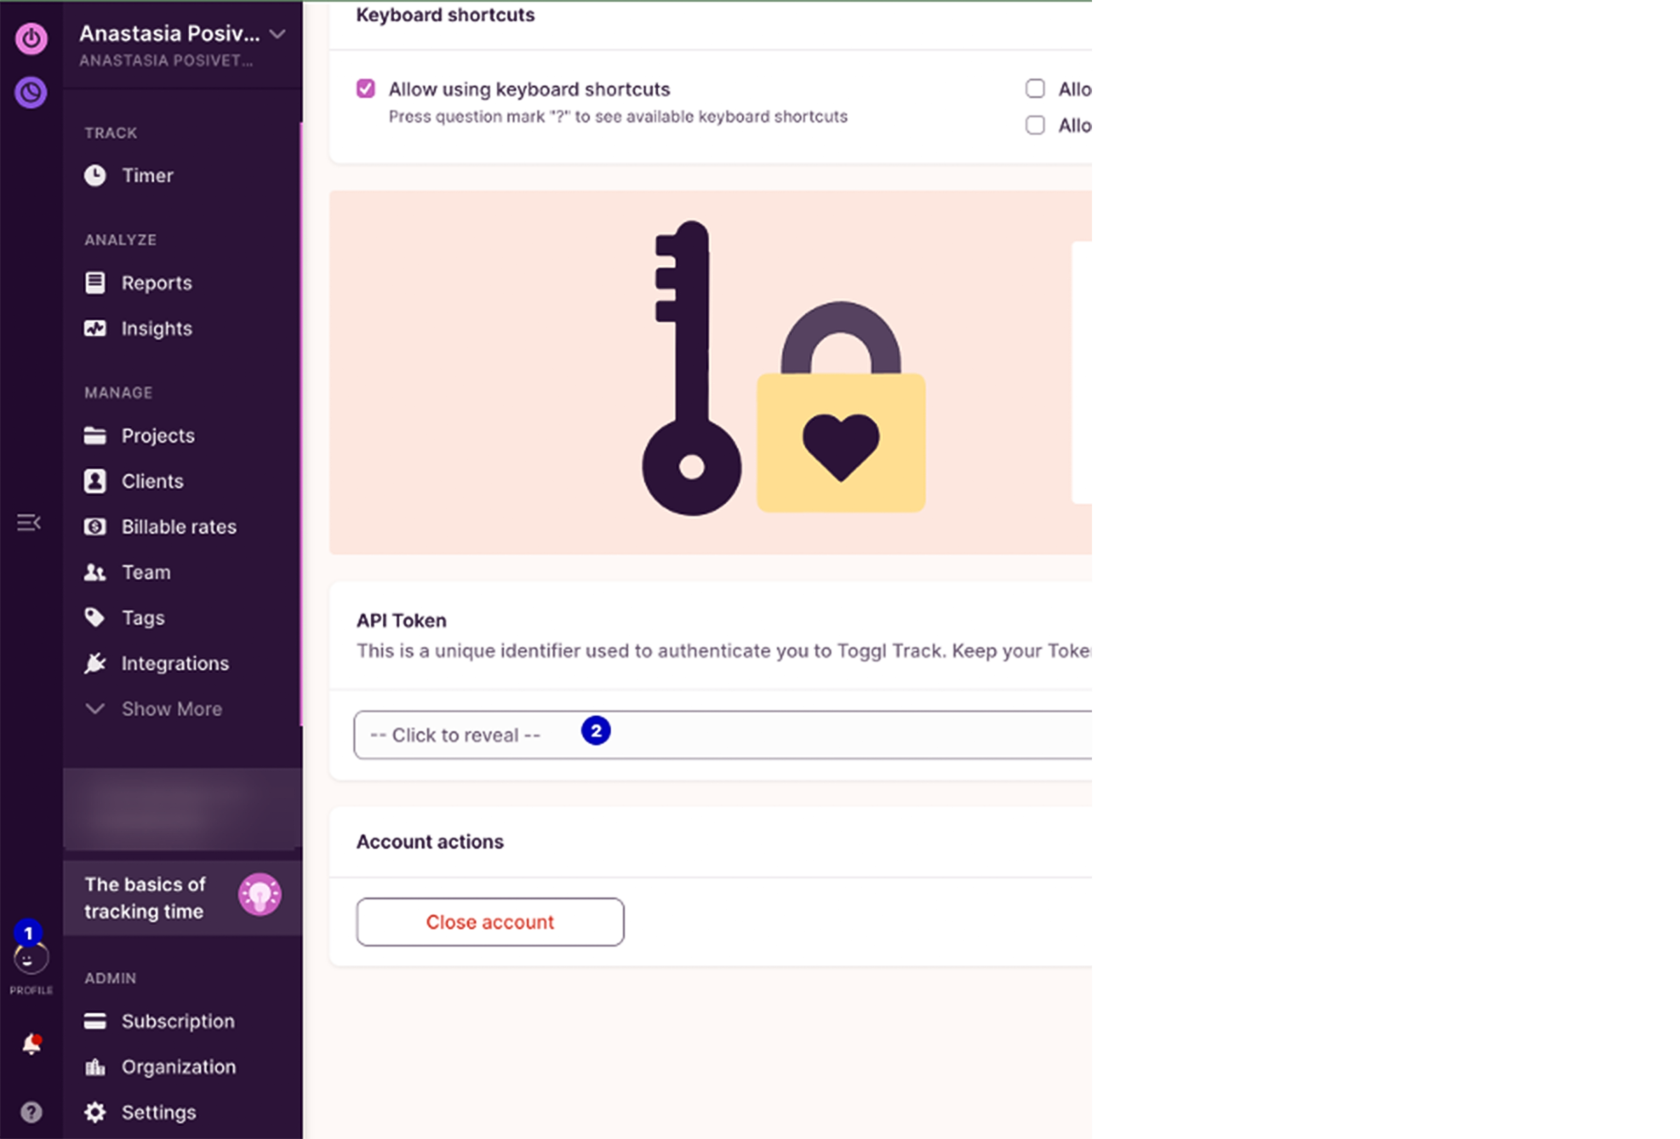
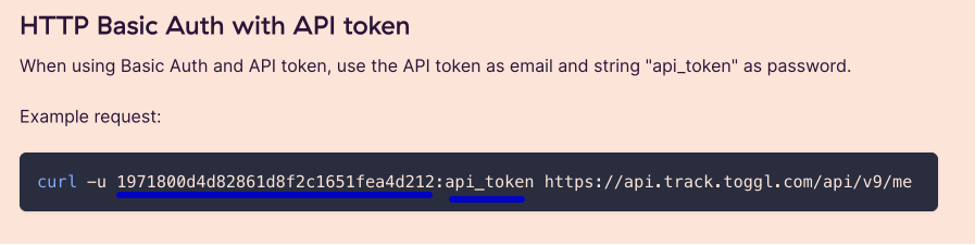
There are several ways according to the Toggl doc, we are going to use Api Token (see this page).
Get your Api Token under your profile in Toggl
Your Auth with ApiToken according to the doc should contain ApiTokenValue:api_token_keyword
Hence it’s necessary to configure params in the Named Credentials.
Let’s configure it
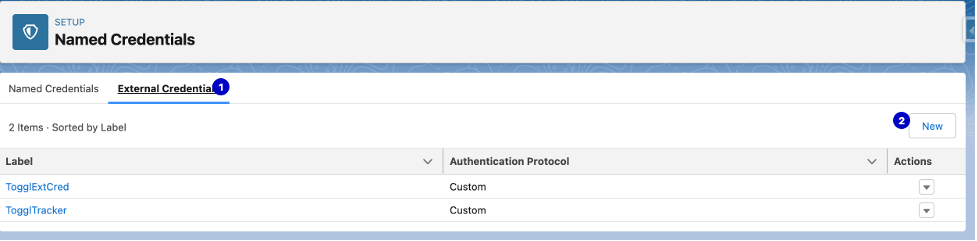
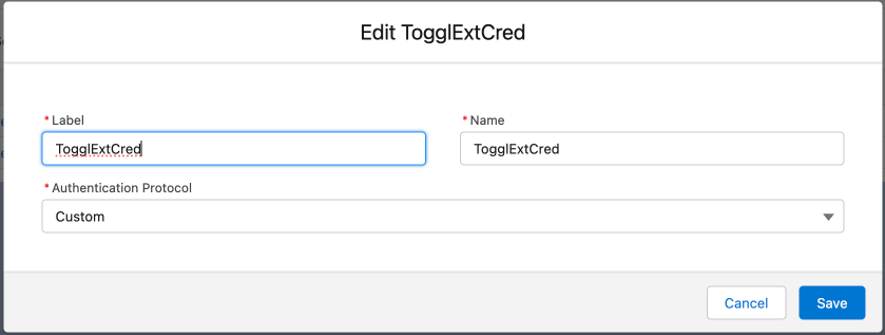
Create External Credential with a Custom auth.protocol
Define and configure the principals (in our case will be Admin)

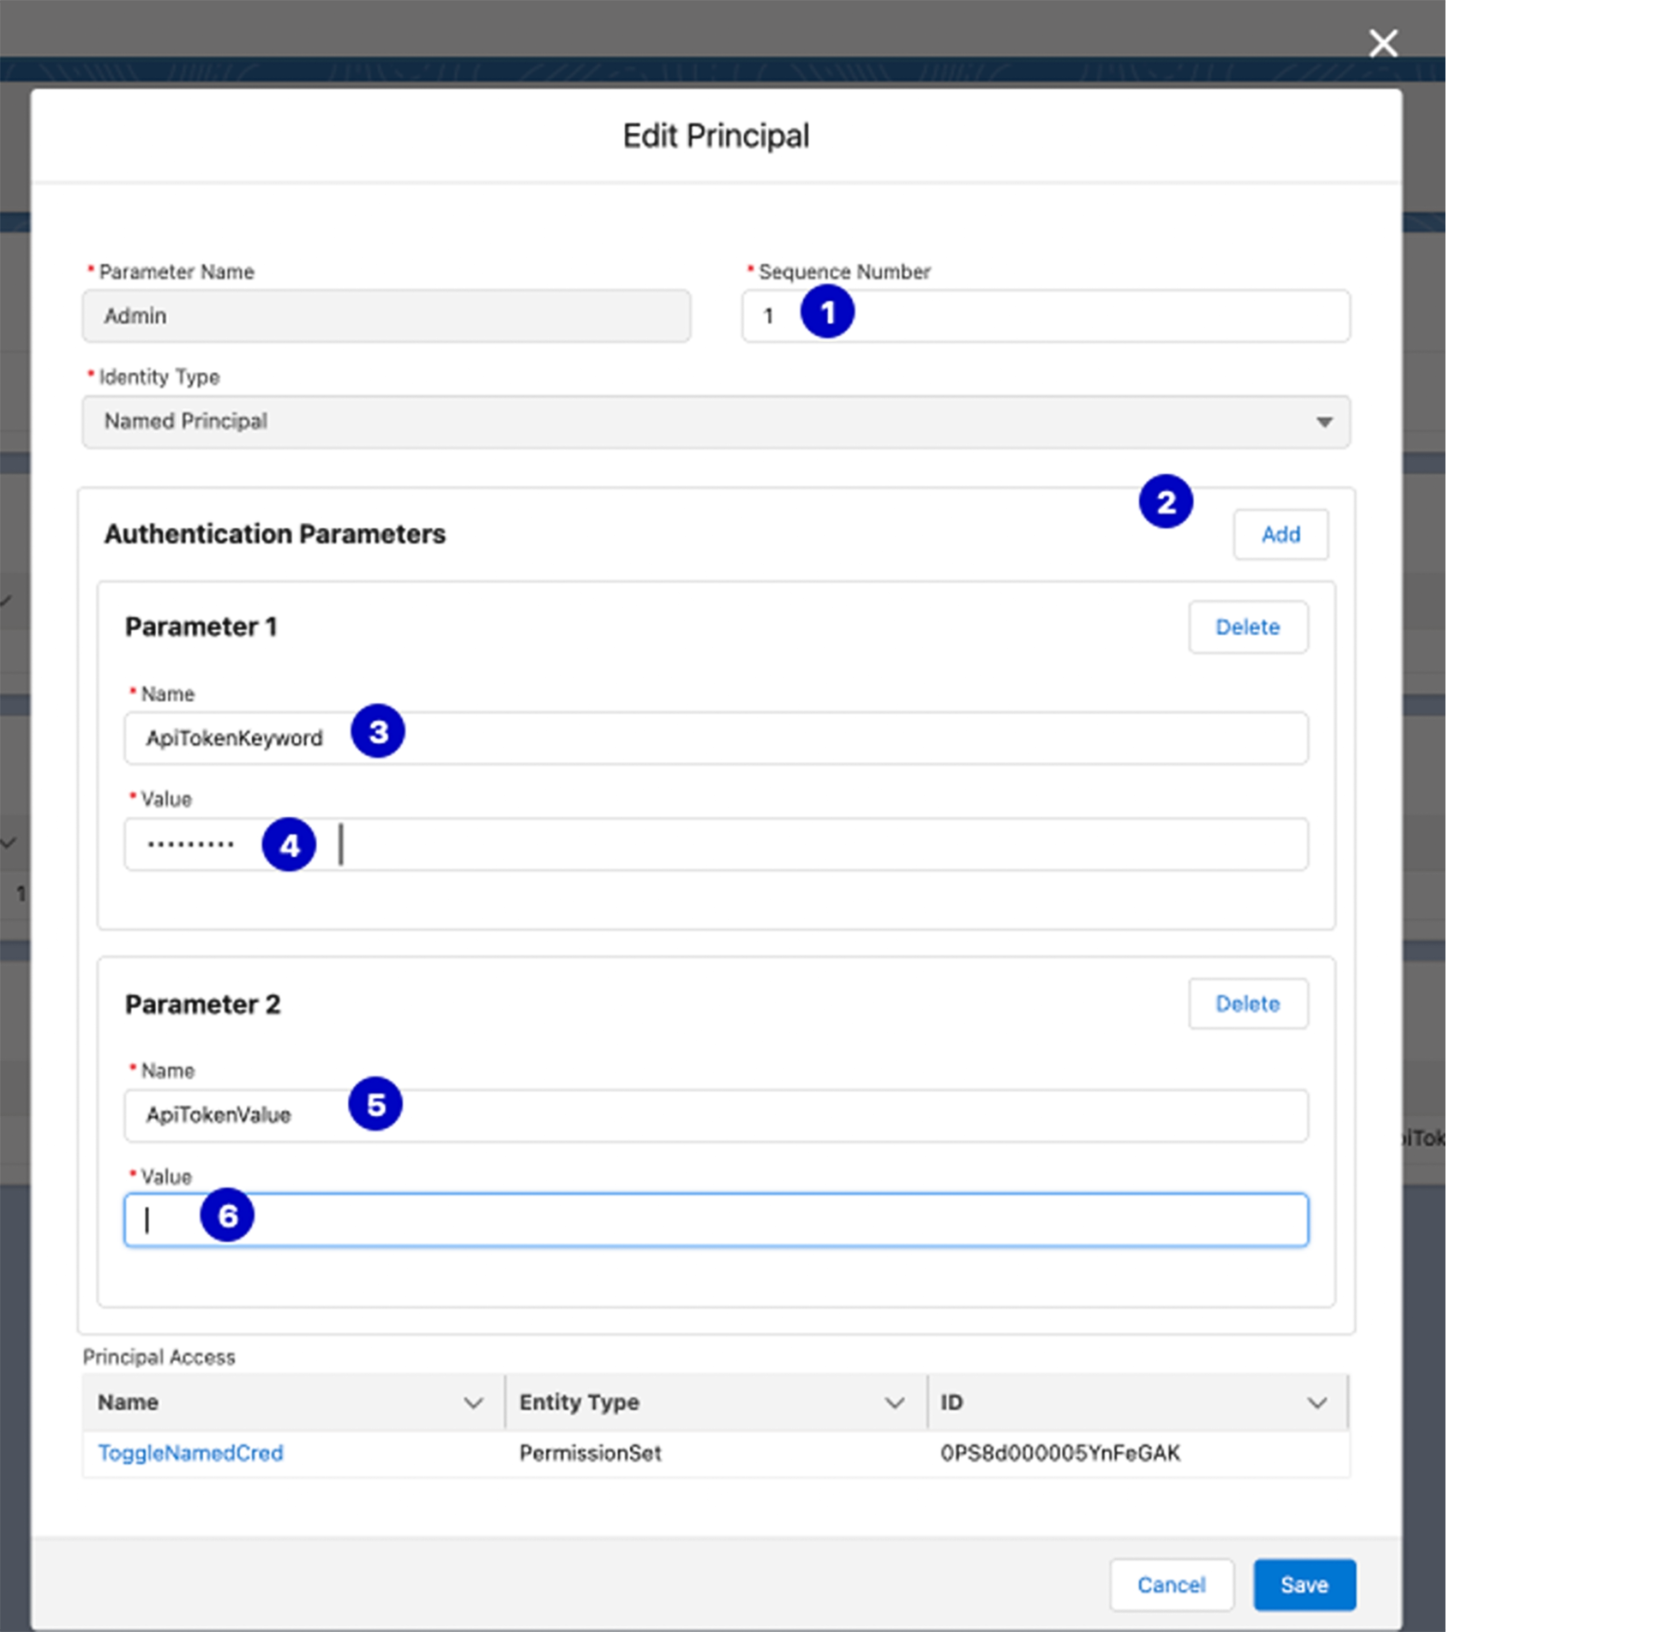
1 – in our case we have only 1 auth user
2 – add param
3,4 – one of the param is the ApiTokenKeyword name and value will be “api_token” according to Toggl doc
5,6 – another param is the ApiTokenValue name and value will be generated by the Api Token from the Toggl system (example: 1971800d4d82861d8f2c1651fea4d212).
2 – add param
3,4 – one of the param is the ApiTokenKeyword name and value will be “api_token” according to Toggl doc
5,6 – another param is the ApiTokenValue name and value will be generated by the Api Token from the Toggl system (example: 1971800d4d82861d8f2c1651fea4d212).
Now configure header to reflect the way how Toggl accepts it:
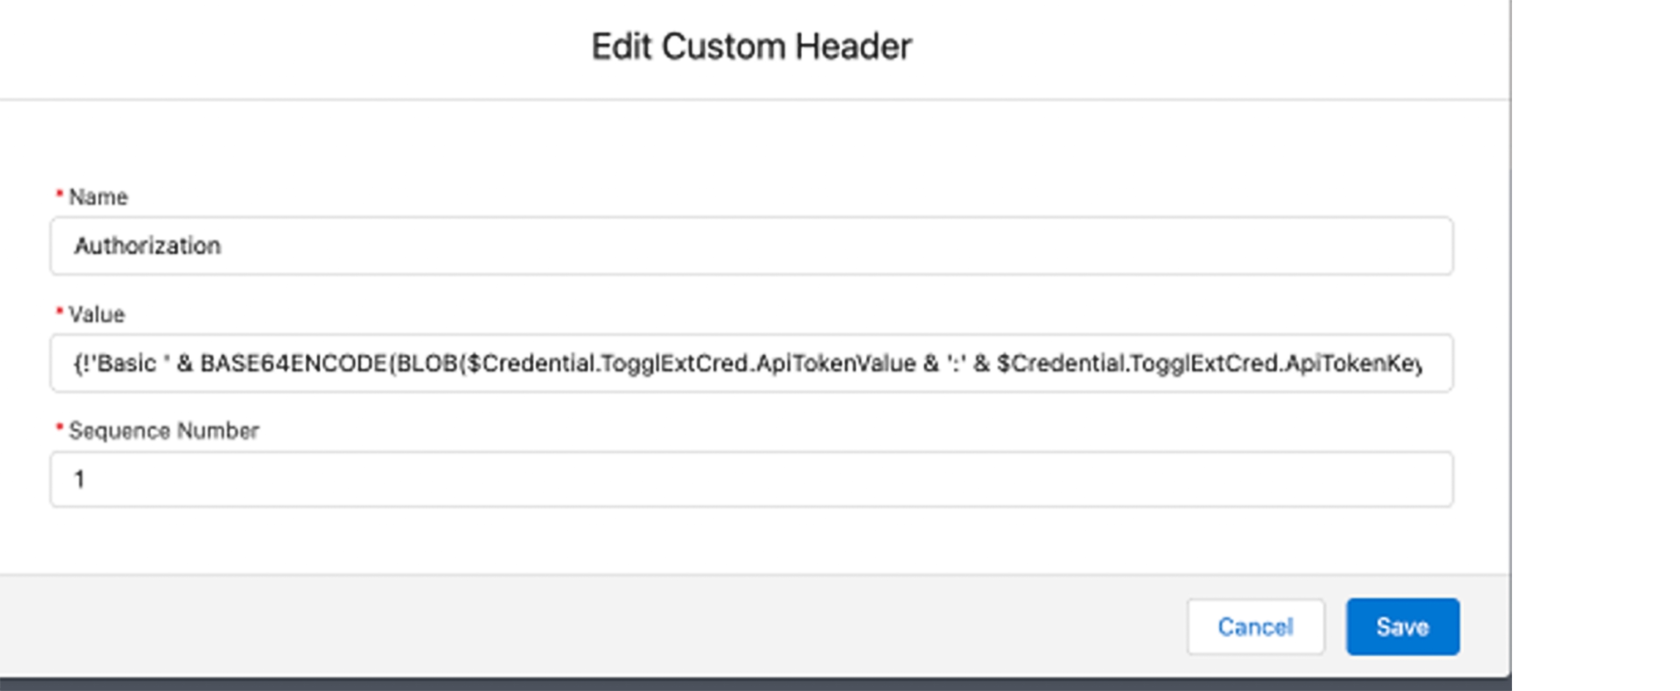
{!'Basic ' & BASE64ENCODE(BLOB($Credential.TogglExtCred.ApiTokenValue & ':' & $Credential.TogglExtCred.ApiTokenKeyword))}
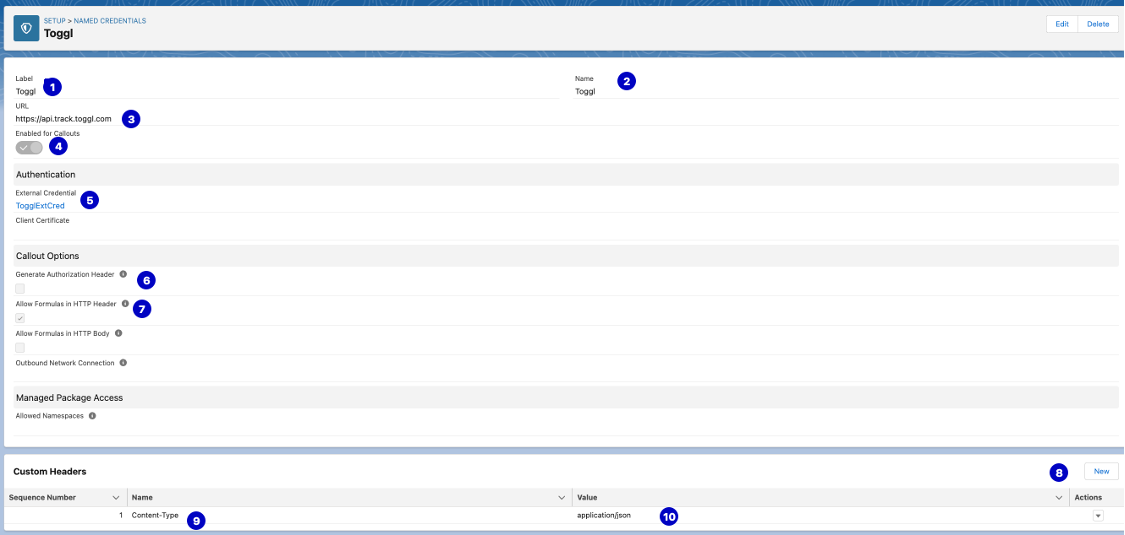
After that configure named credential

To be like this
And finally create a permission set to grant access to your named credential and a user that is going to use it.
#2. Create custom apex provider for external data source
You can also find all below code in this repo.
You should extend the class DataSource.Connection in order to handle search, sync, query, upsert and delete operations. Consider that if you just need to read data from the Toggl and don’t need to update/create/delete in from Salesforce, then upsert and delete methods are not required to be implemented.
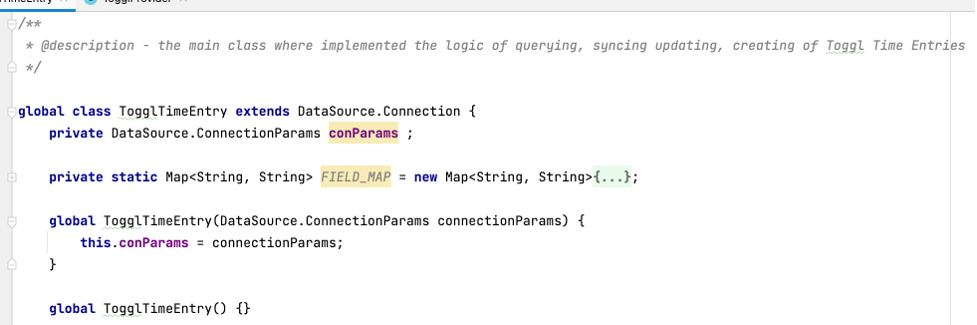
In our case, we are going to focus only on sync, query and upsert logic.
Now we are going to override 3 methods:
a) Sync
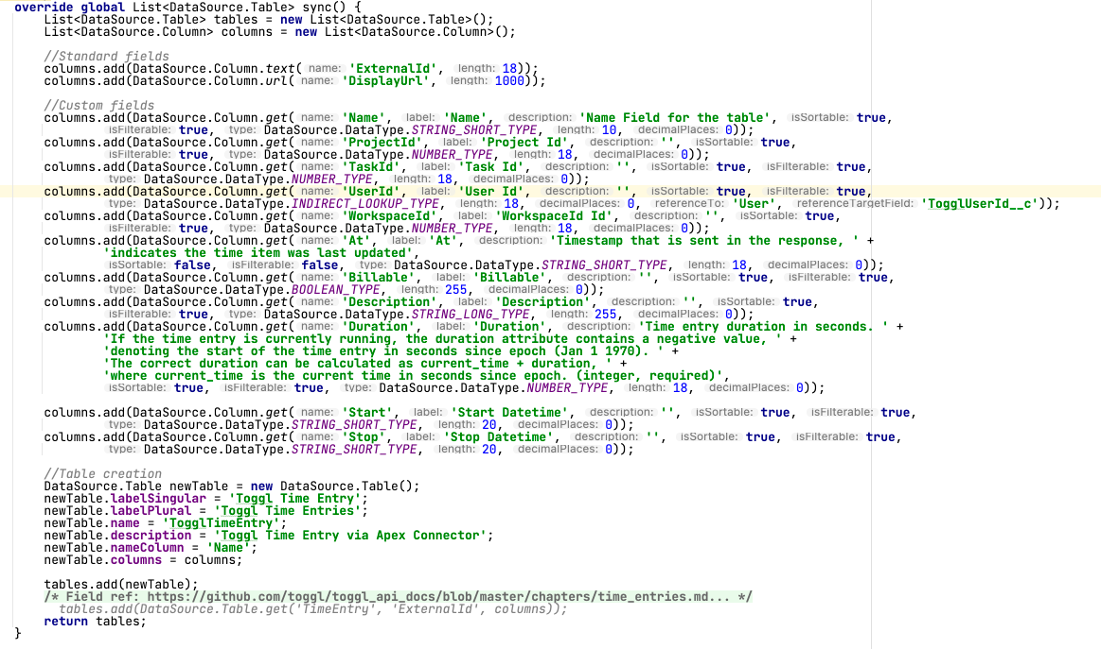
This method will create the new object and its fields. Later, when we click on “Sync And Validate” button during the creation of the External Data Source, this method would be called.
This method will create the new object and its fields. Later, when we click on “Sync And Validate” button during the creation of the External Data Source, this method would be called.
Things to consider:
- Standard Fields: We only have to define 2 required columns and specify their API Names. Display URL that is link and can allow us to see the recond in Toggl, but in our case we are not able to see the time entry without authentication; External Id that will help us to set the uniqueness across the whole organization and represents the Id of Time entry from Toggl.

- Custom Fields: Here we are going to specify all fields that is necessary to show in our external object.
There are 2 ways to specify every single column:
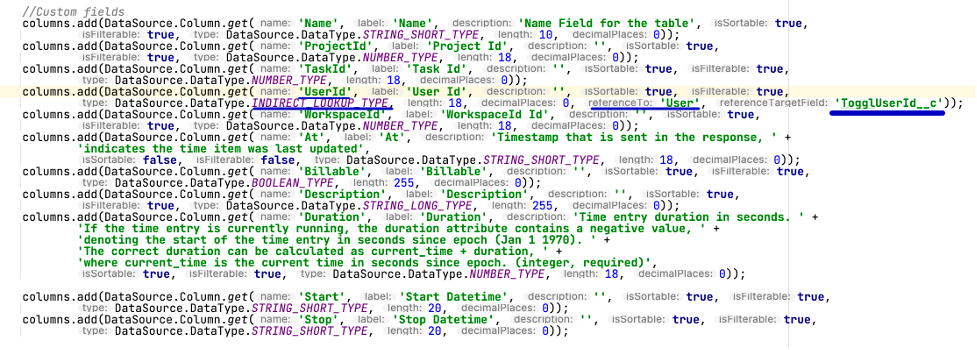
1) columns.add(DataSource.Column.text(‘‘DesiredName’’,255)); - it’s a short and not precise way and we only specify the API name and its length.
2) columns.add(DataSource.Column.get(‘DesiredName’,
‘ Desired Name’,
‘Some desription’,
isSrotable, isFilterable,
fieldType,
fieldLength, decimalPlaces if number));
In our case we used the 2nd way.
And from the doc we used only these values to be created in Salesforce:
And from the doc we used only these values to be created in Salesforce:
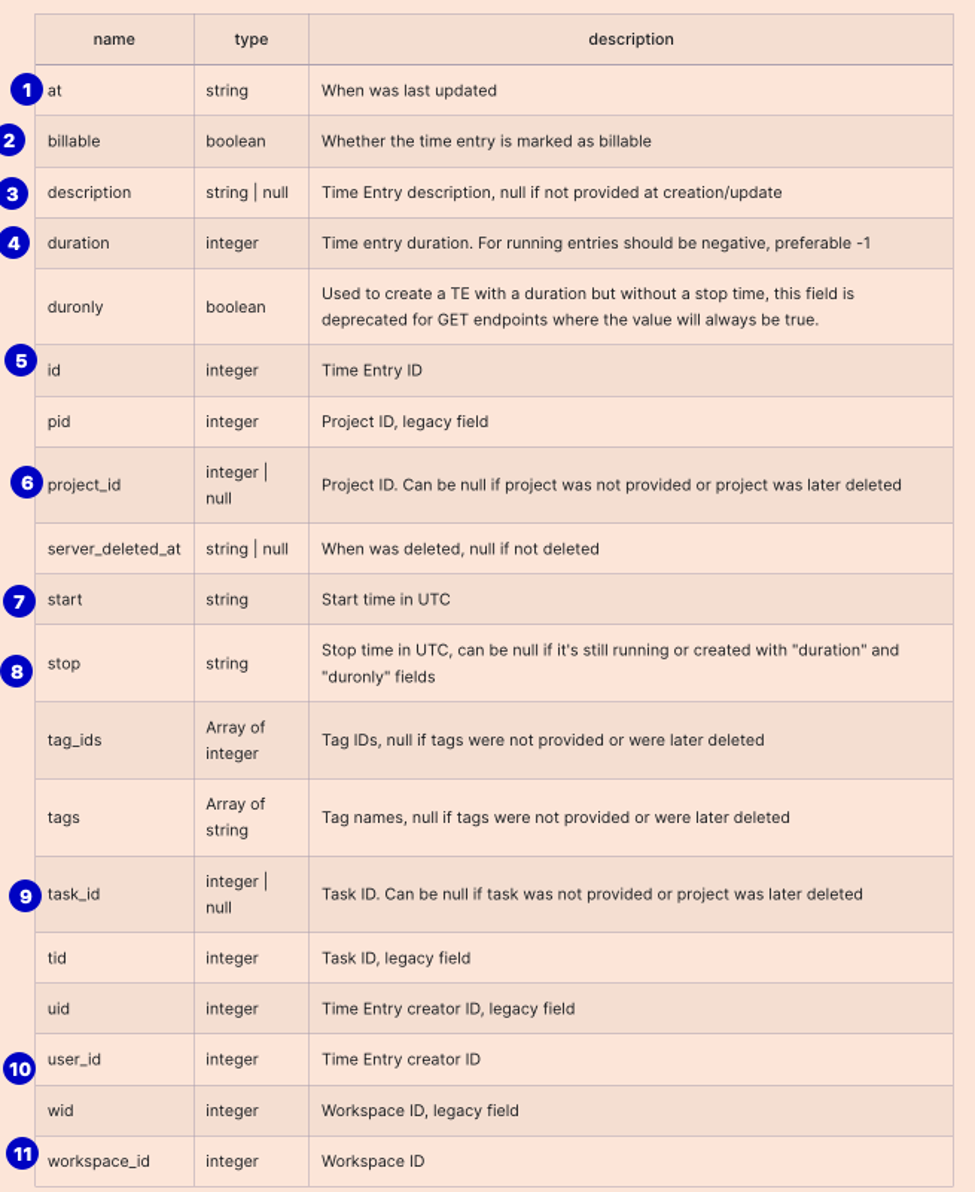
An additional “Name” field will be created to be in Auto-number style.
Also, you could notice that “UserId” field is of Indirect lookup type, that was done in order to link with a Salesforce User that has the same Id via user field “TogglUserId__c”. Later it will showed how it was done.
Also, you could notice that “UserId” field is of Indirect lookup type, that was done in order to link with a Salesforce User that has the same Id via user field “TogglUserId__c”. Later it will showed how it was done.
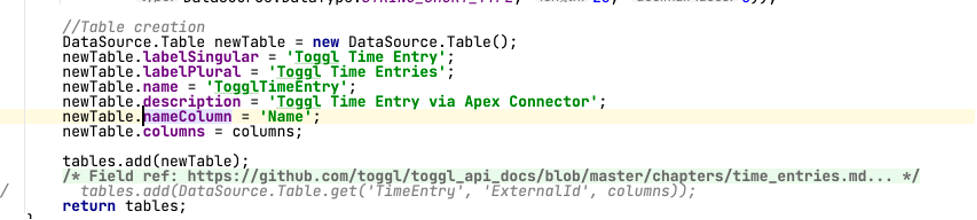
- Table creation: We will specify some features of the new external object. The “Name” field will specify the column that will help us to open every single record instead of having to do it with just the External Id one.
b) Query
This method will help us to make queries in the organization like SOQL and the User Interface, list views and how the data will be showed when you click on ExternalId or Name in ListView. There are 2 ways in our code sample:
1) simple
2) and more sophisticated
This method will help us to make queries in the organization like SOQL and the User Interface, list views and how the data will be showed when you click on ExternalId or Name in ListView. There are 2 ways in our code sample:
1) simple
2) and more sophisticated
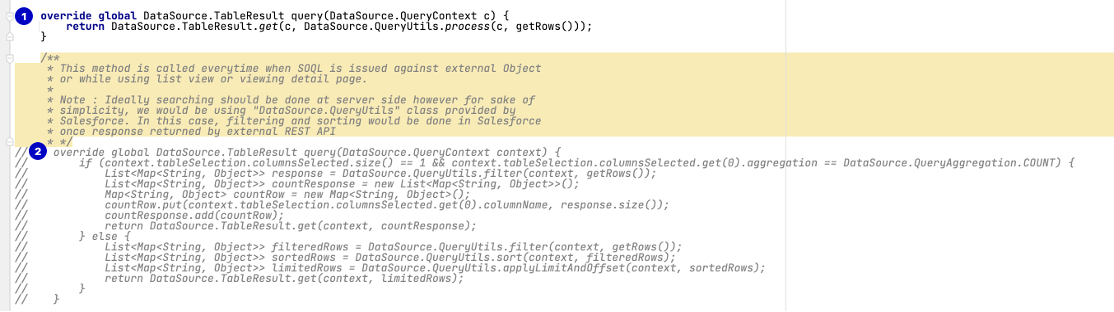
But what you should focus on is the getRows() method that performs a REST Callout to read all time entries from Toggl and store it in the external object in Salesforce.
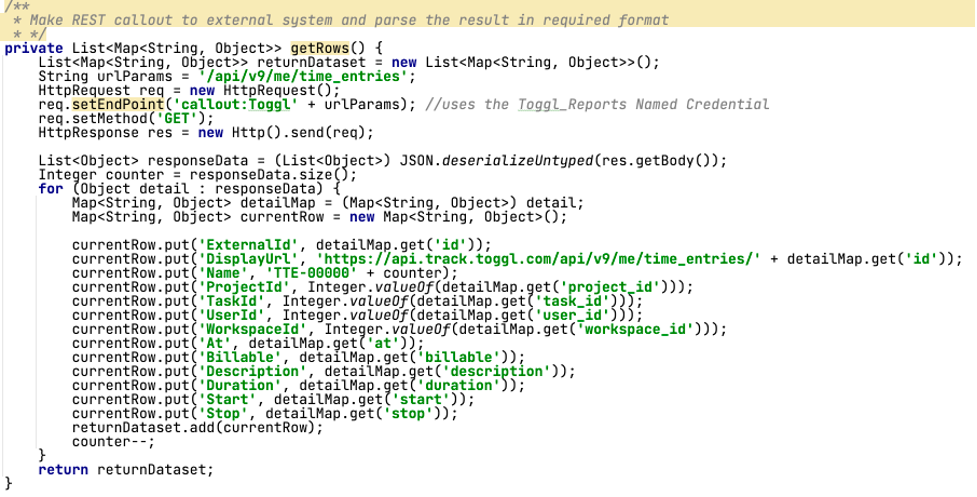
Basically, here there is no magic, you just create a HTTP request using your named credential, receive response and parse it into your configured fields.
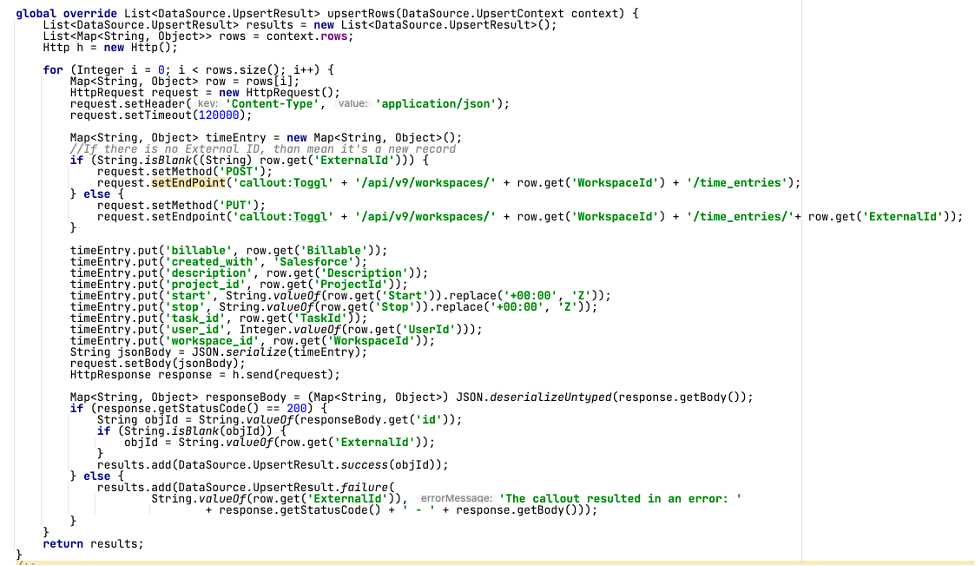
c) UpsertRows
This method helps us to handle create and update records from Salesforce to Toggl. Also, there you will see just a proper REST Callouts to update or create data in Toggl according to their doc.
c) UpsertRows
This method helps us to handle create and update records from Salesforce to Toggl. Also, there you will see just a proper REST Callouts to update or create data in Toggl according to their doc.
d) Create an apex provider
Your provider class must extend DataSource.Provider and override 3 methods
Your provider class must extend DataSource.Provider and override 3 methods
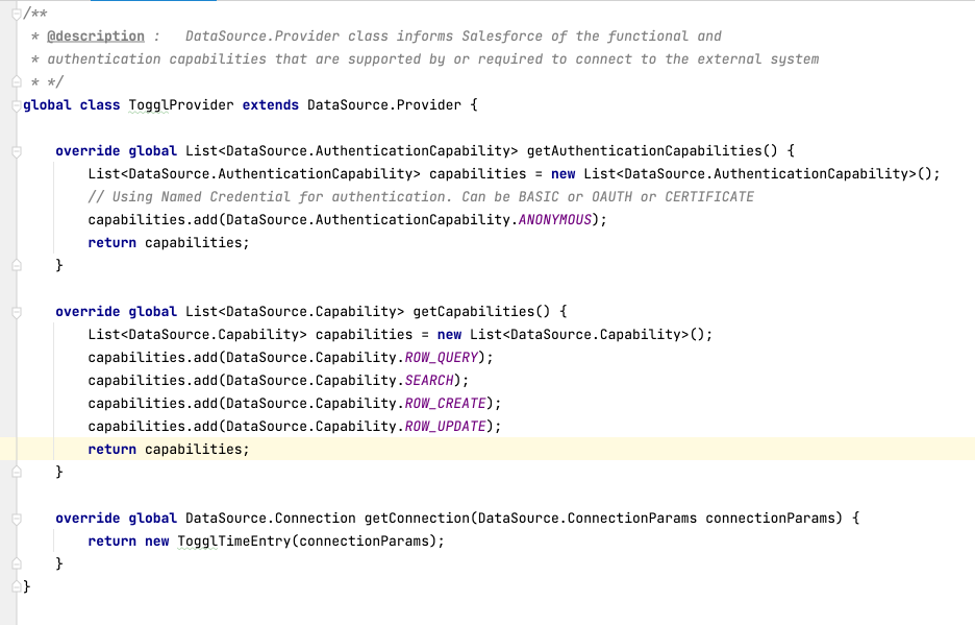
- getAuthenticationCapabilities method helps us to set up authentication credentials. Since we use a configured named credential in our case it will be ANONYMOUS.
- getCapabilities method allows us to determine what the Datasource is capable of during a SOQL or SOSL. We are going to allow a user to see, search, create, update records in Salesforce.
- getConnection method creates the connection making a call to our Connector class.
- getCapabilities method allows us to determine what the Datasource is capable of during a SOQL or SOSL. We are going to allow a user to see, search, create, update records in Salesforce.
- getConnection method creates the connection making a call to our Connector class.
#3. Create External Data source, External Toggl Time Entry object and configure it
Now it’s time to create an external source. Go to Setup and fine External Data source and create a new one.
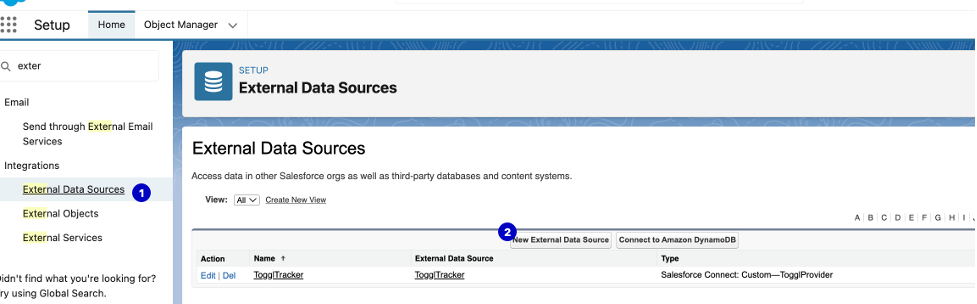
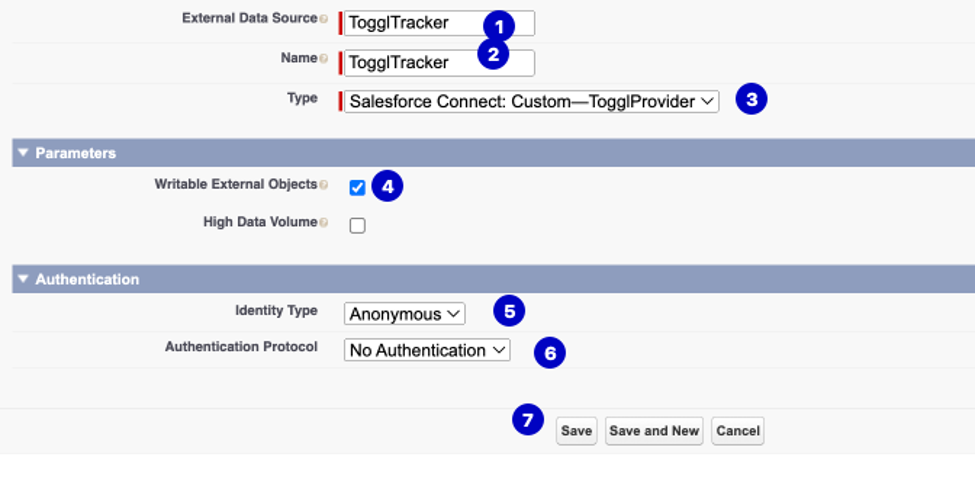
Specify name, type should be your custom provider, select Writable in order to update and create Toggl time entities from Salesforce, select Identity type and protocol.
Then you should “Validate and Sync” your object
Then you should “Validate and Sync” your object
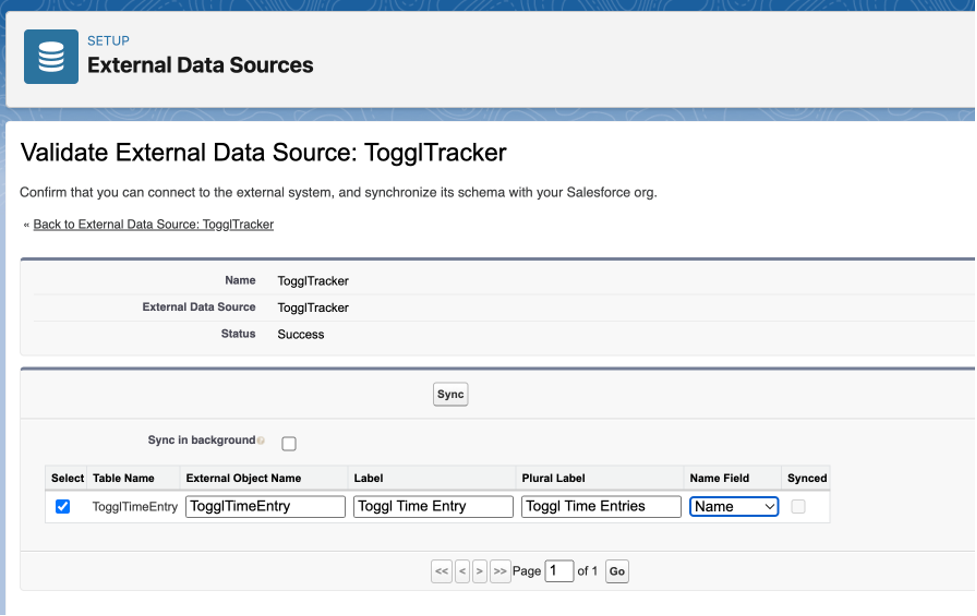
In our case we select Name field “Name” but could be an “External Id” if we previously didn’t create a custom “Name” in sync() method. Click “Sync”.
In case you have made a mistake in your apex class regarding the columns (fields) or table (object), Salesforce will show the error message.
In case you have made a mistake in your apex class regarding the columns (fields) or table (object), Salesforce will show the error message.
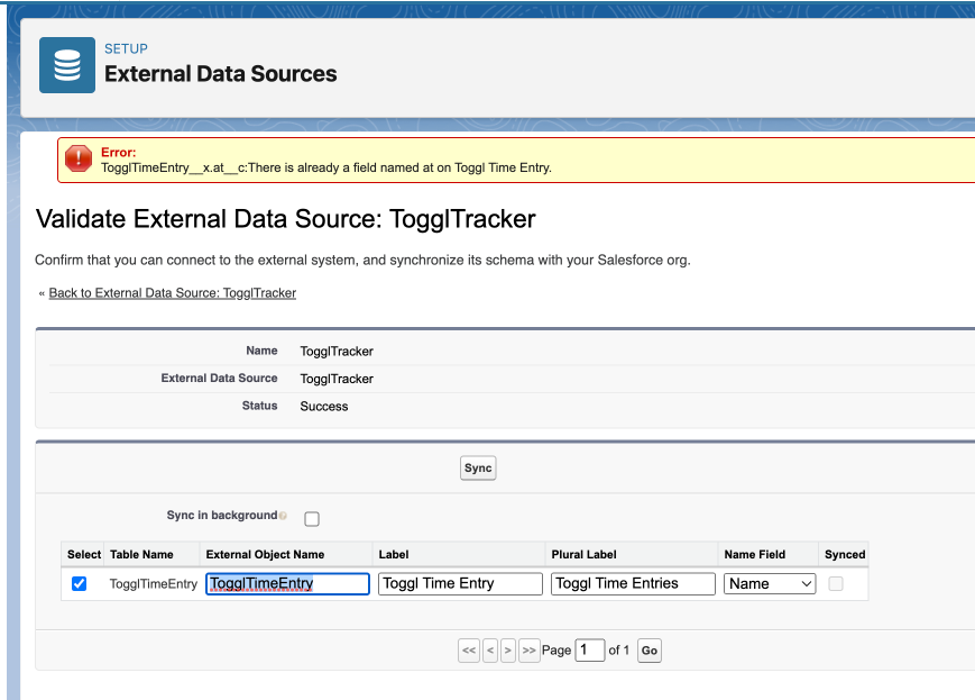
In this case there were 2 “At” fields

Fixing it would help.
After successful syncing, the new external object will automatically be created and you can now customize page layouts, fields, etc.
In order to see records on UI, you should create a tab for your external object.
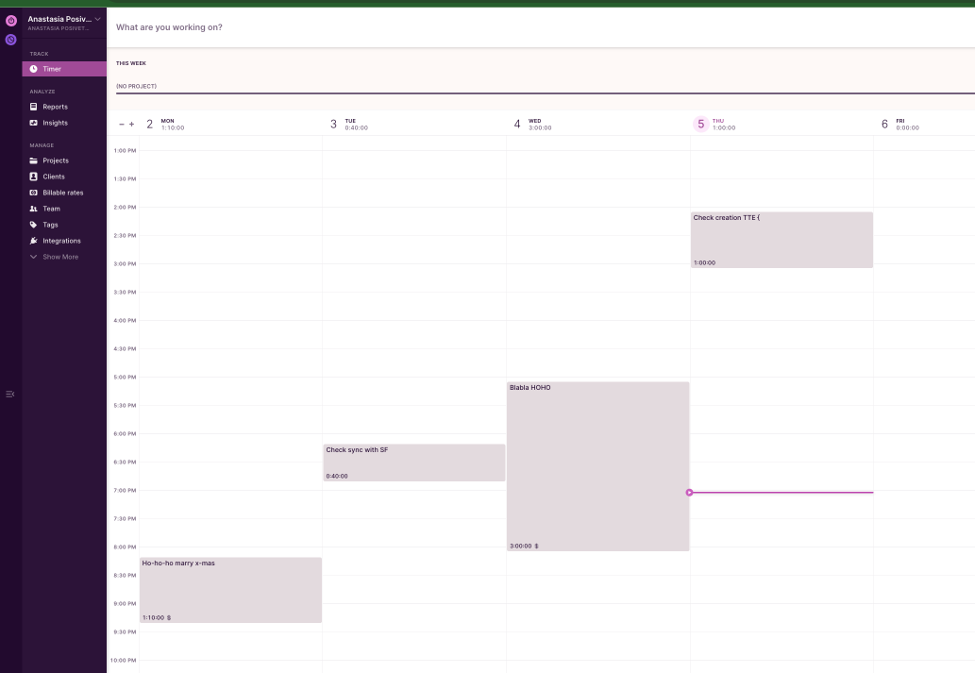
As example here are the time entries in Toggl:
As example here are the time entries in Toggl:
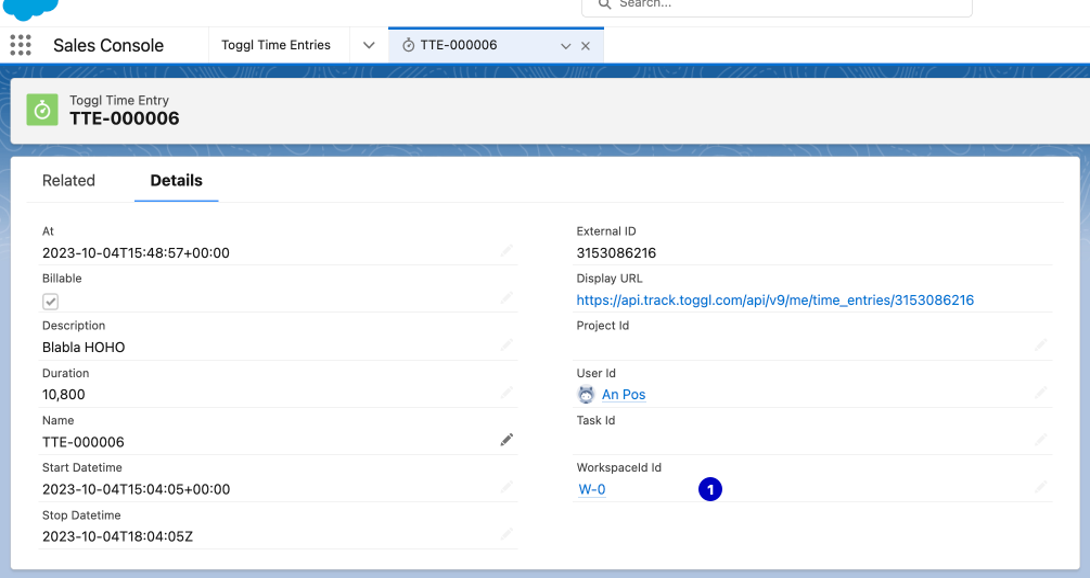
Here you can see your record in Salesforce:
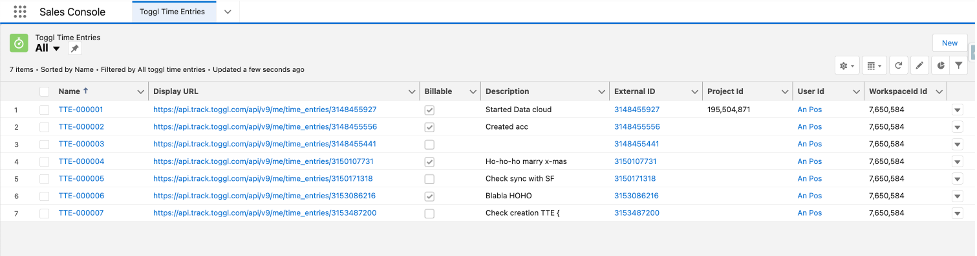
If you create new time entry in Toggl, it will appear in Salesforce in real-time and vice versa.
You could notice that User Id is a lookup
You could notice that User Id is a lookup

This was achieved via a sync() method

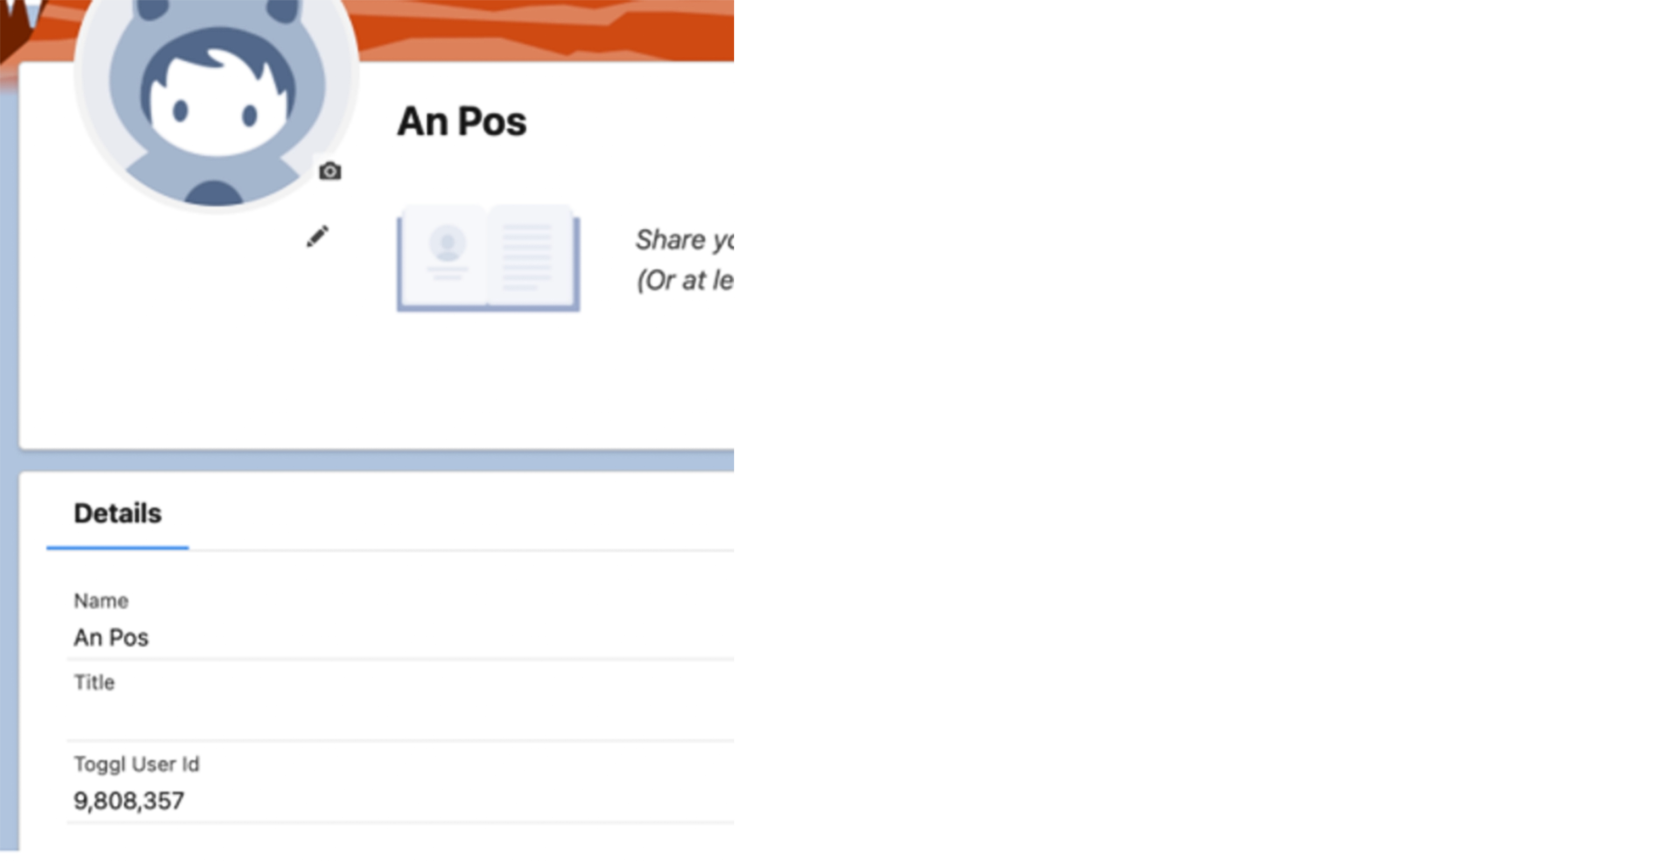
On a user object a field “TogglUserId” was created, number, external id, and in our case this field is filled with 9808357. Since we have in Salesforce such a user, external record was automatically matched by this External Id.
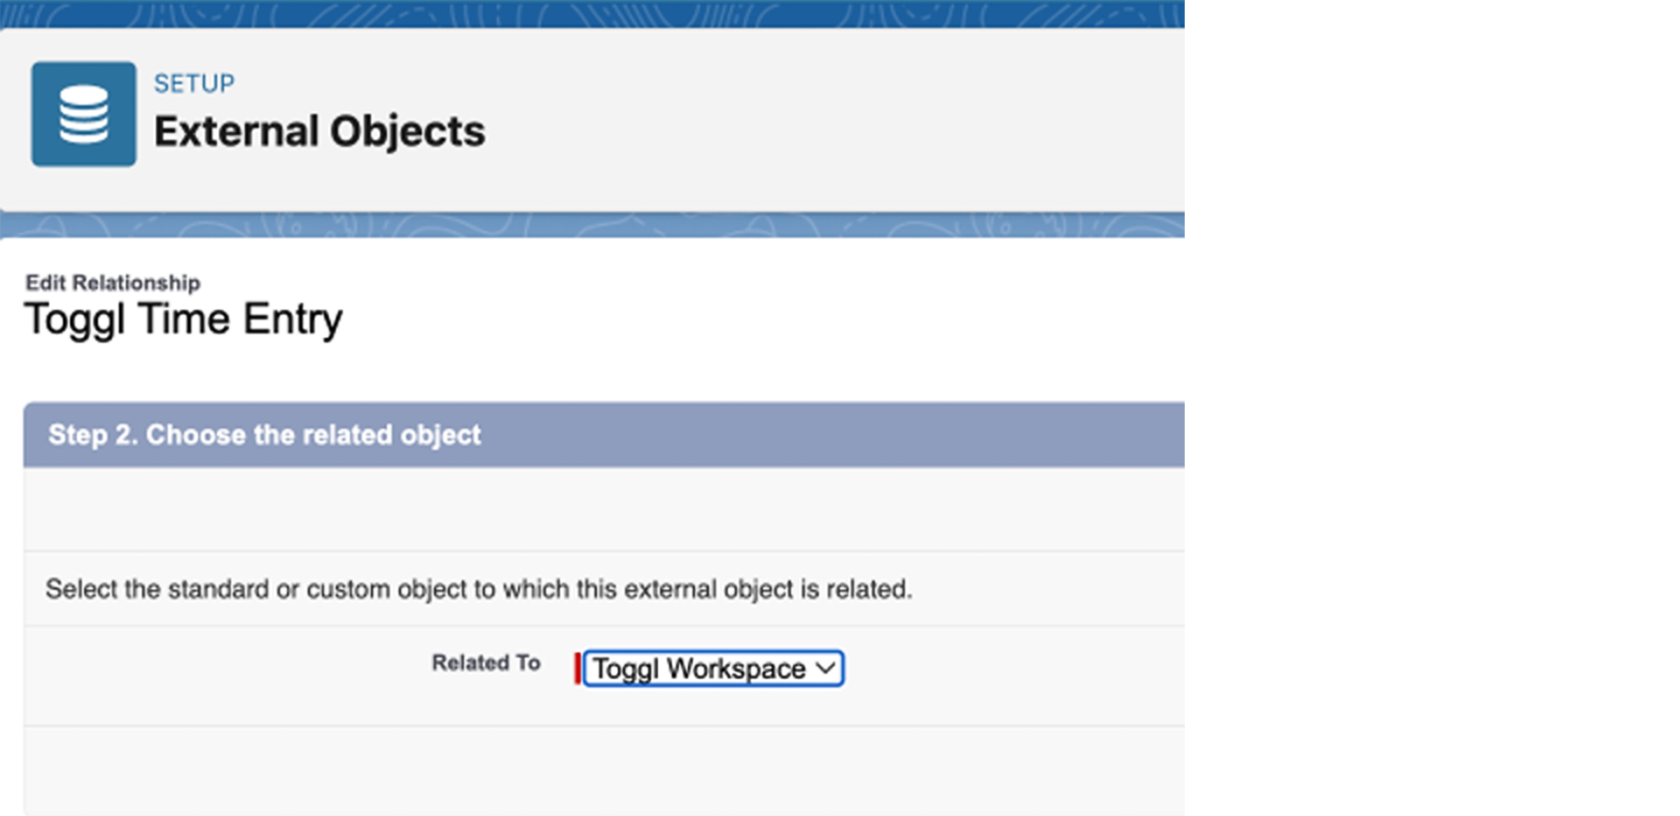
Later, if you realize that you want to make for example, Workspace as indirect lookup to the object Workspace (you should have this object in Salesforce then), you can go directly to your external object, find this field and change the field type:
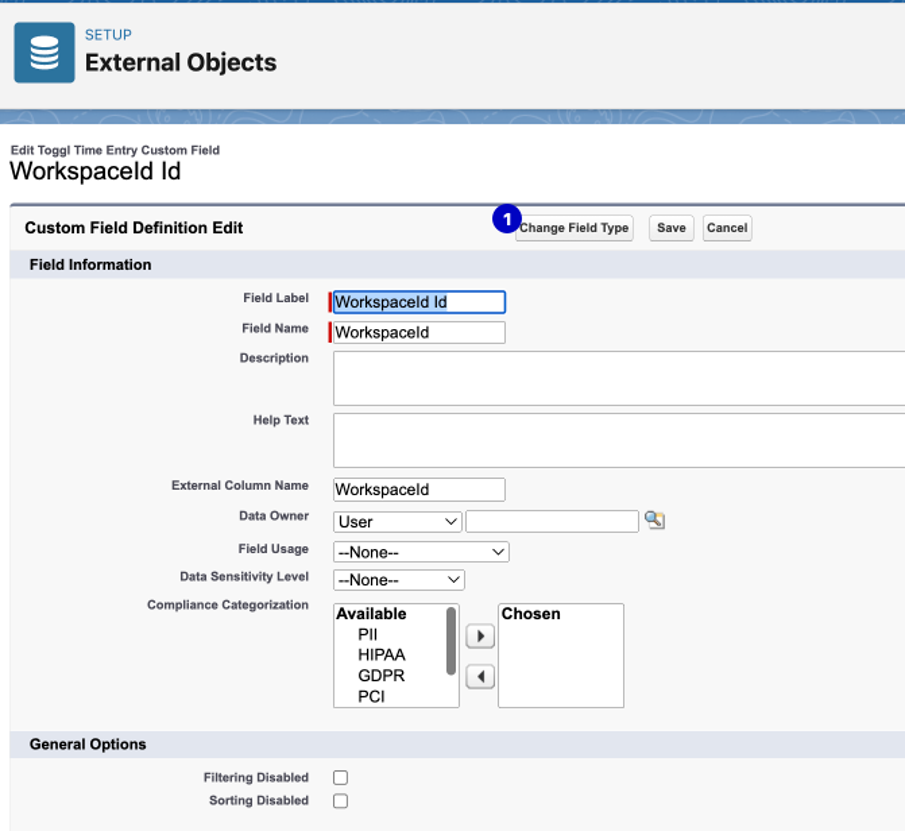
Type - indirect lookup because we are going to link an external object to a custom object.
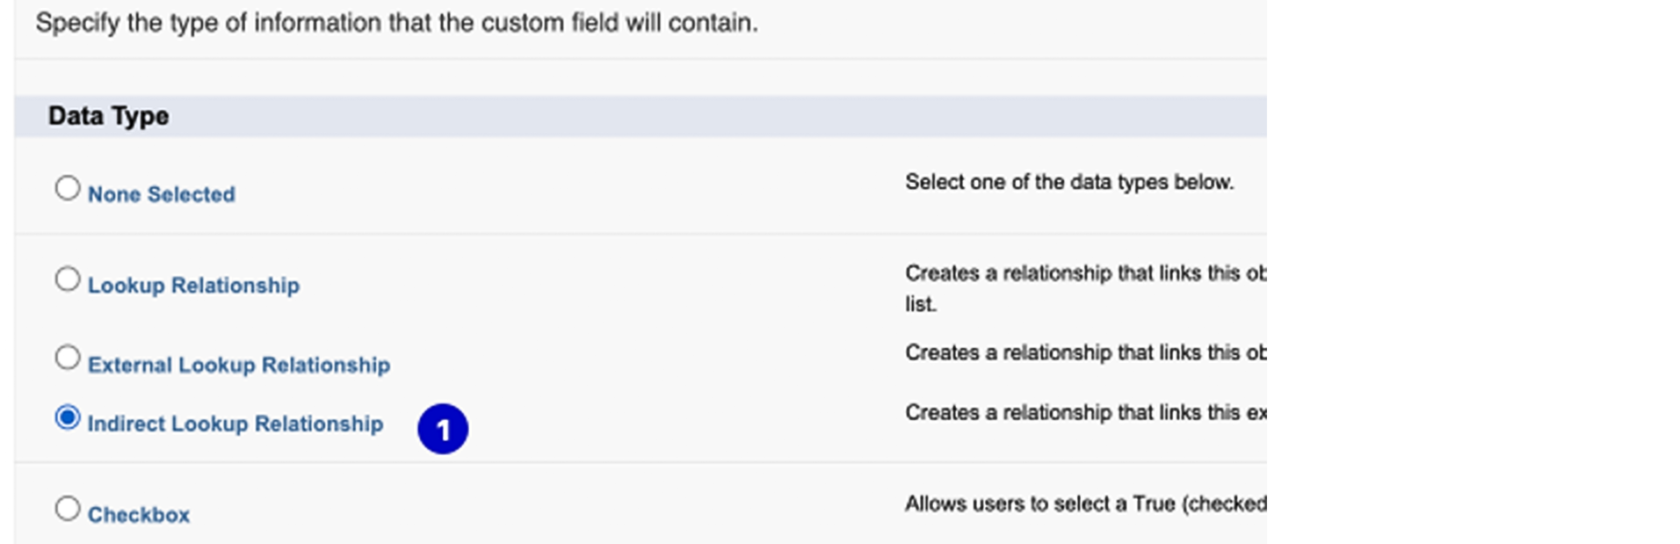
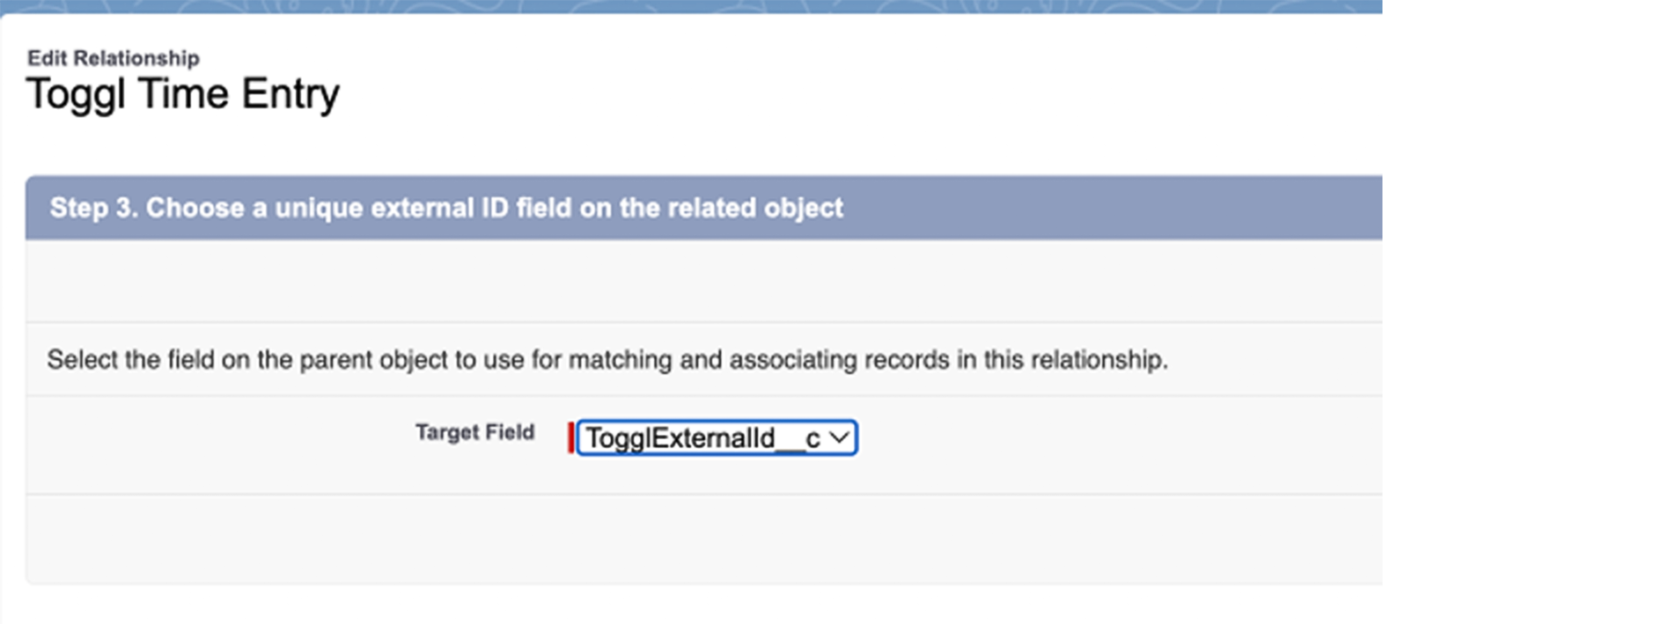
And voila! If you have a respective record with the matching external id you will see the lookup to workspace record.