This article is prepared by our developer Dmitry Mitkevich.

It is often necessary to reread the Chat Transcript with the customer to identify a problem and its solution, but the dialog can be very long and contain irrelevant information. AI comes to the rescue. It will easily provide you with the most important points of dialogue without unnecessary information.
In this article we will use OpenAI, triggers and Apex classes.
!Good to know!
Before we start, I recommend familiarizing yourself with the OpenAI limits by clicking the link.
Main steps:
1) Create an account on OpenAI.com and generate an ApiKey
2) Set up Named Credentials
3) Add external credential principal access to the profile
4) Create a text field on the Chat Transcript object, where the compressed information of the dialogue with the customer will be stored
5) Create the main logic using Apex Trigger and Apex Classes

Generating ApiKey
After creating an OpenAI account, we need to generate an ApiKey. Go to Personal and select View API keys. Click on the Create new secret key button and enter the name of your key. Copy and save the generated key somewhere, we will need it later.
API keys are used for authenticating a calling program to another API - typically to confirm a project is authorized to connect.
Set up Named Credentials
A named credential specifies the URL of a callout endpoint and its required authentication parameters in one definition. To simplify the setup of authenticated callouts, specify a named credential as the callout endpoint.
Salesforce manages all authentication for callouts that specify a named credential as the callout endpoint. You can also skip remote site settings, which are otherwise required for callouts to external sites, for the site defined in the named credential.
In the setup Quick find box find Named Credentials, choose External Credentials tab and click New button.
Enter external credential Label, Name and Authentication Protocol and click Save.

Click New button near the Principal section and enter:
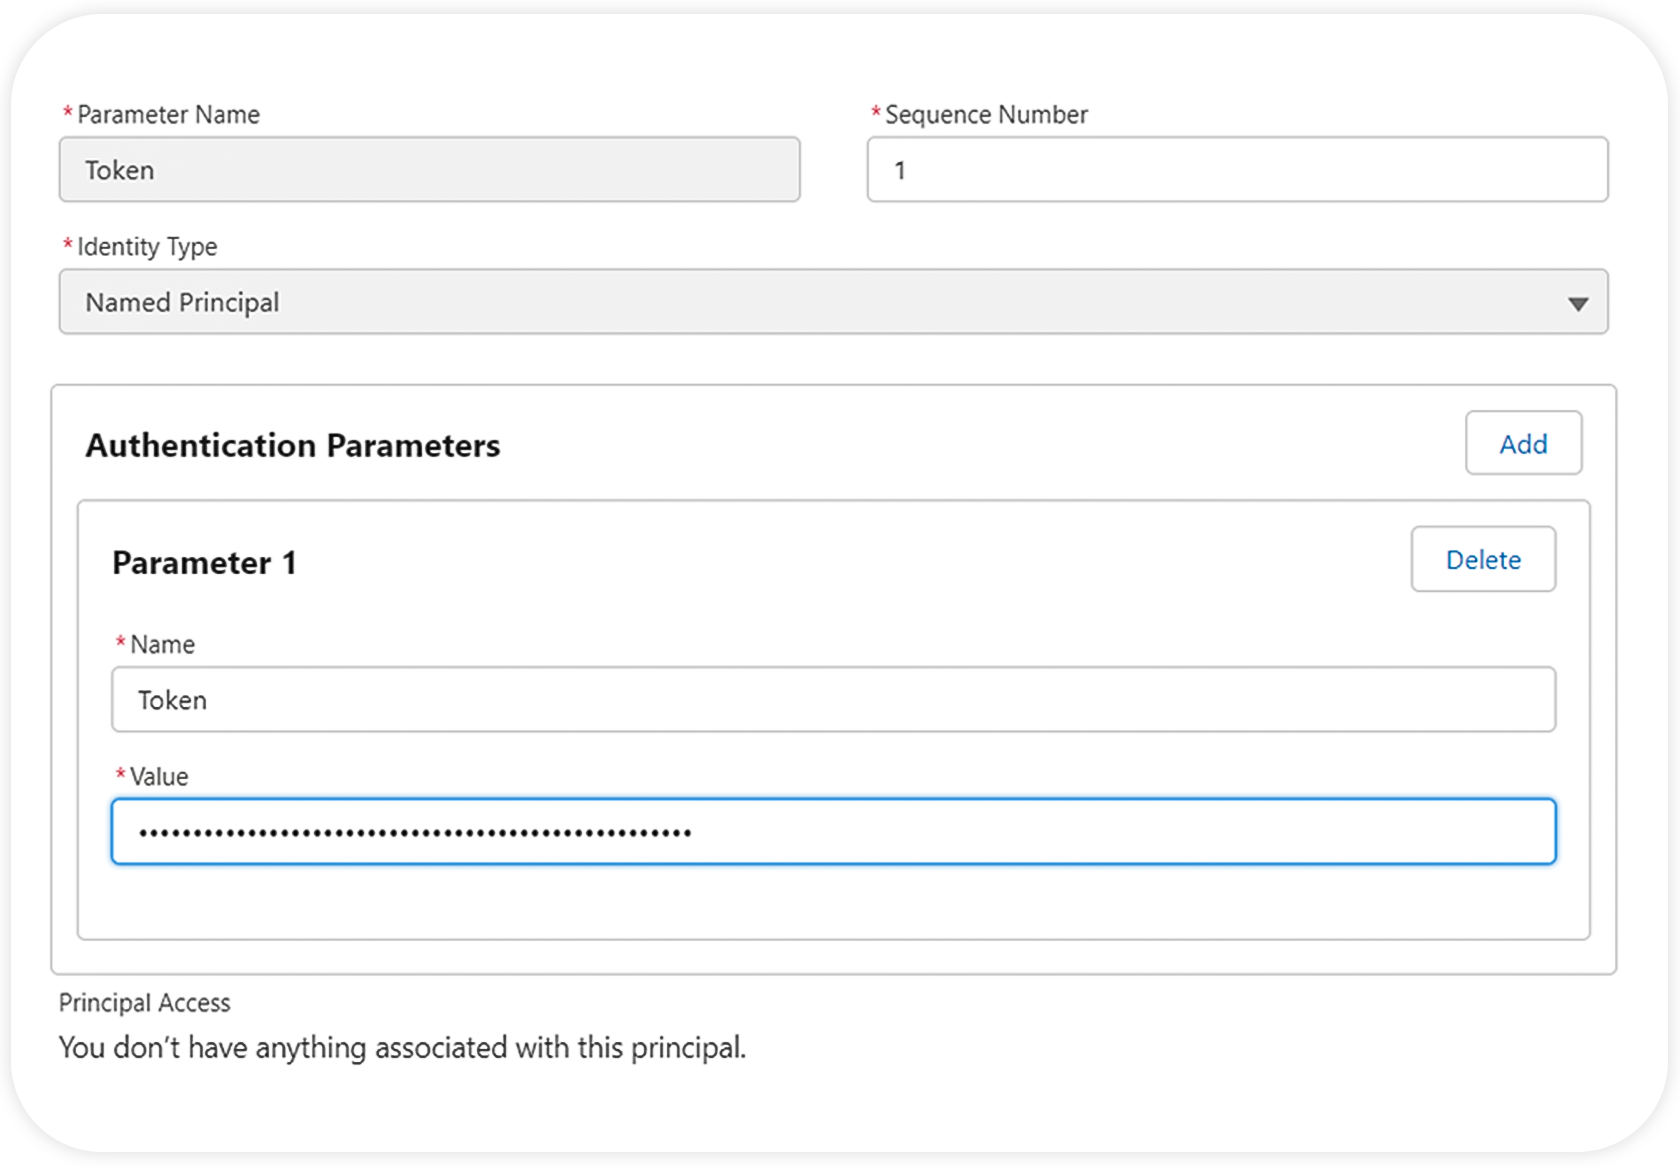
Parameter Name: Token
Sequence Number: 1.
Add Authentication Parameters and enter
Parameter Name: Token
Value: your OpenAI generated ApiKey
and click Save.
Parameter Name: Token
Sequence Number: 1.
Add Authentication Parameters and enter
Parameter Name: Token
Value: your OpenAI generated ApiKey
and click Save.
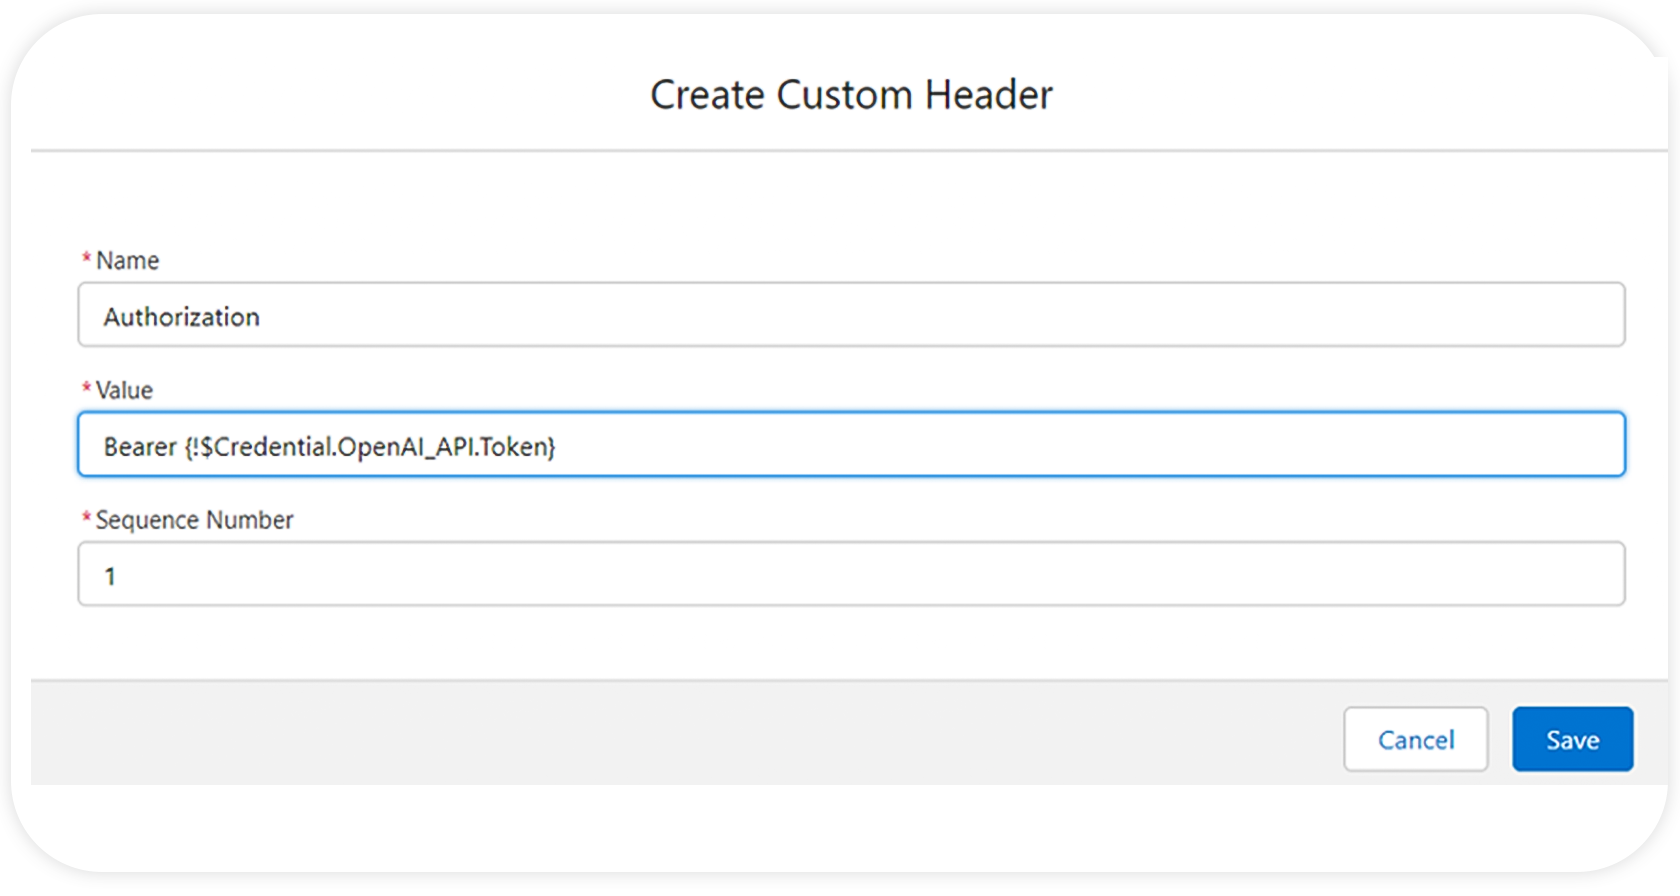
Click New button near the Custom Headers section and enter:
Name: Authorization
Value: {!$Credential.Your_Named_Credential_API_Name.Your_Principal_Name}
Sequence Number: 1
Name: Authorization
Value: {!$Credential.Your_Named_Credential_API_Name.Your_Principal_Name}
Sequence Number: 1
Click Save.
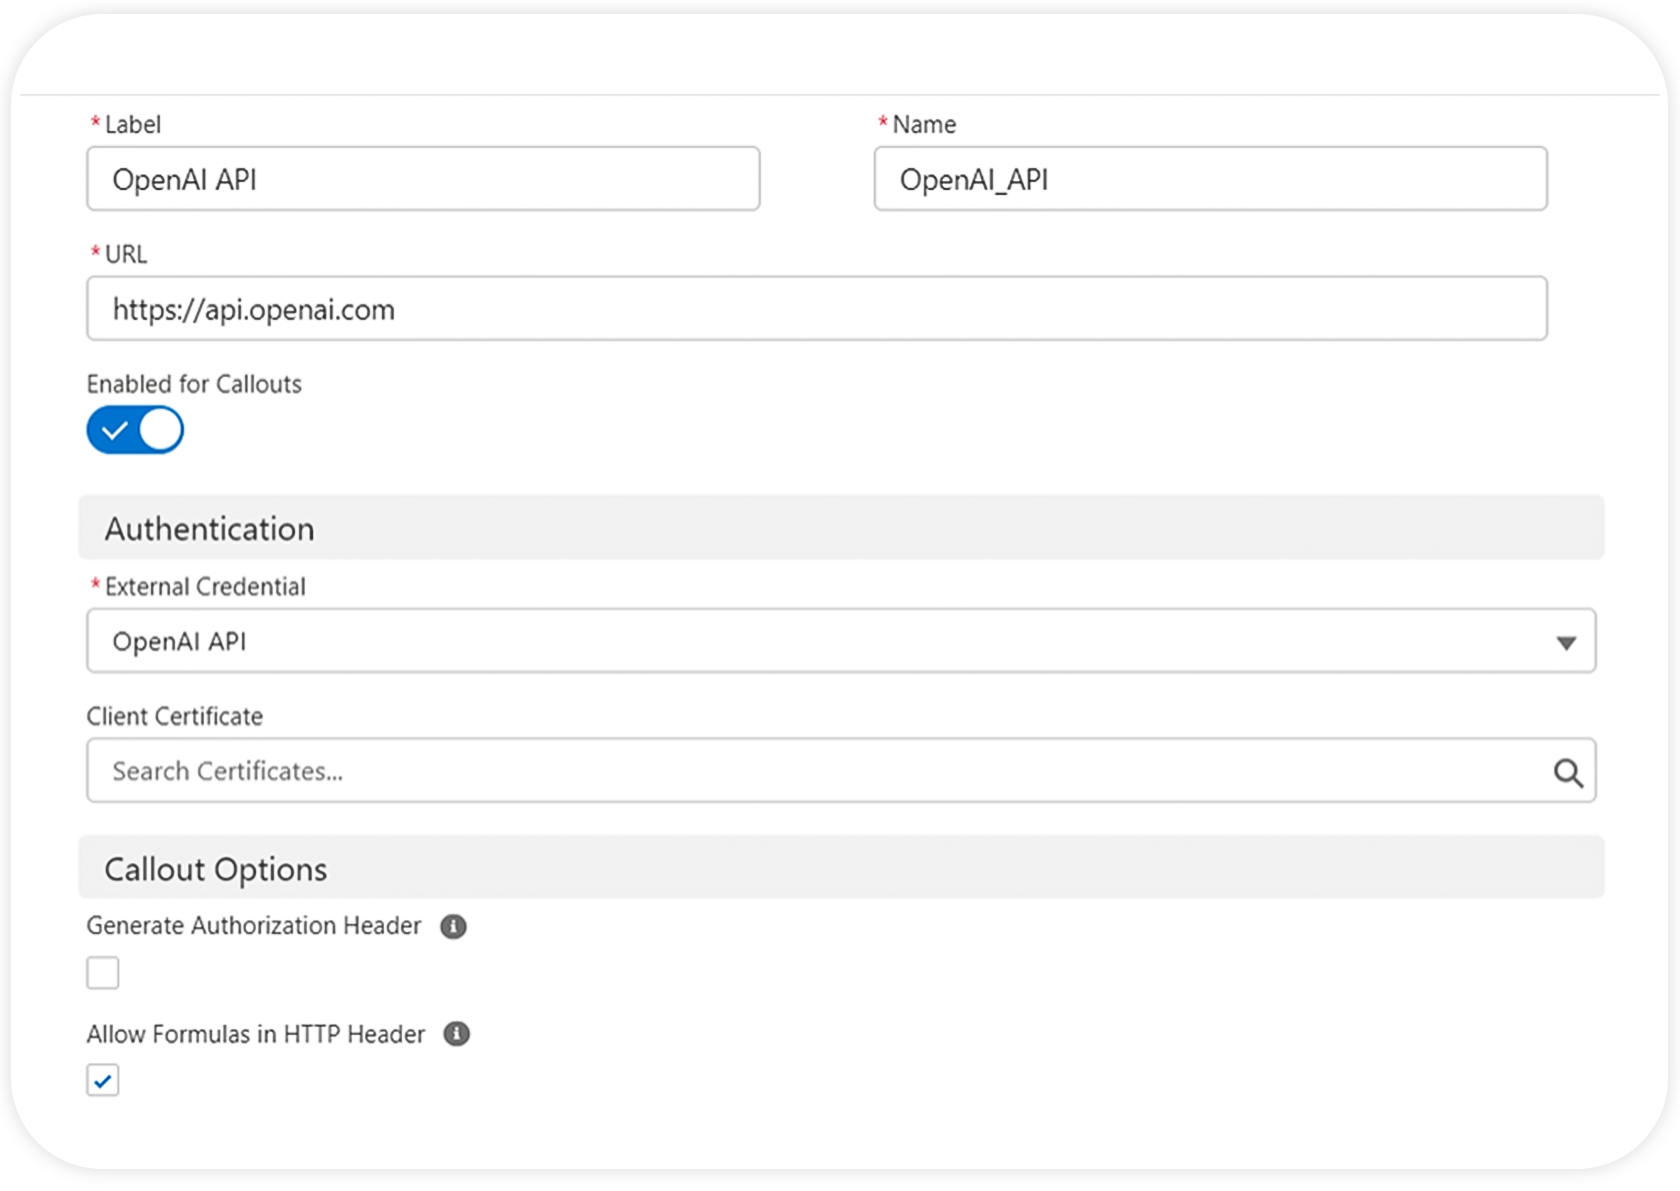
Go to the Named Credentials and click New. Enter Named credentials:
Label: OpenAI API
Name: OpenAI_API
URL: https://api.openai.com
Select your external credential from the picklist, uncheck Generate Authorization Header checkbox, check Allow Formulas in HTTP Header checkbox and click Save.
Go to the Named Credentials and click New. Enter Named credentials:
Label: OpenAI API
Name: OpenAI_API
URL: https://api.openai.com
Select your external credential from the picklist, uncheck Generate Authorization Header checkbox, check Allow Formulas in HTTP Header checkbox and click Save.
Click New button near the Custom Headers section and enter:
Name: Content-Type
Value: application/json
Sequence Number: 1
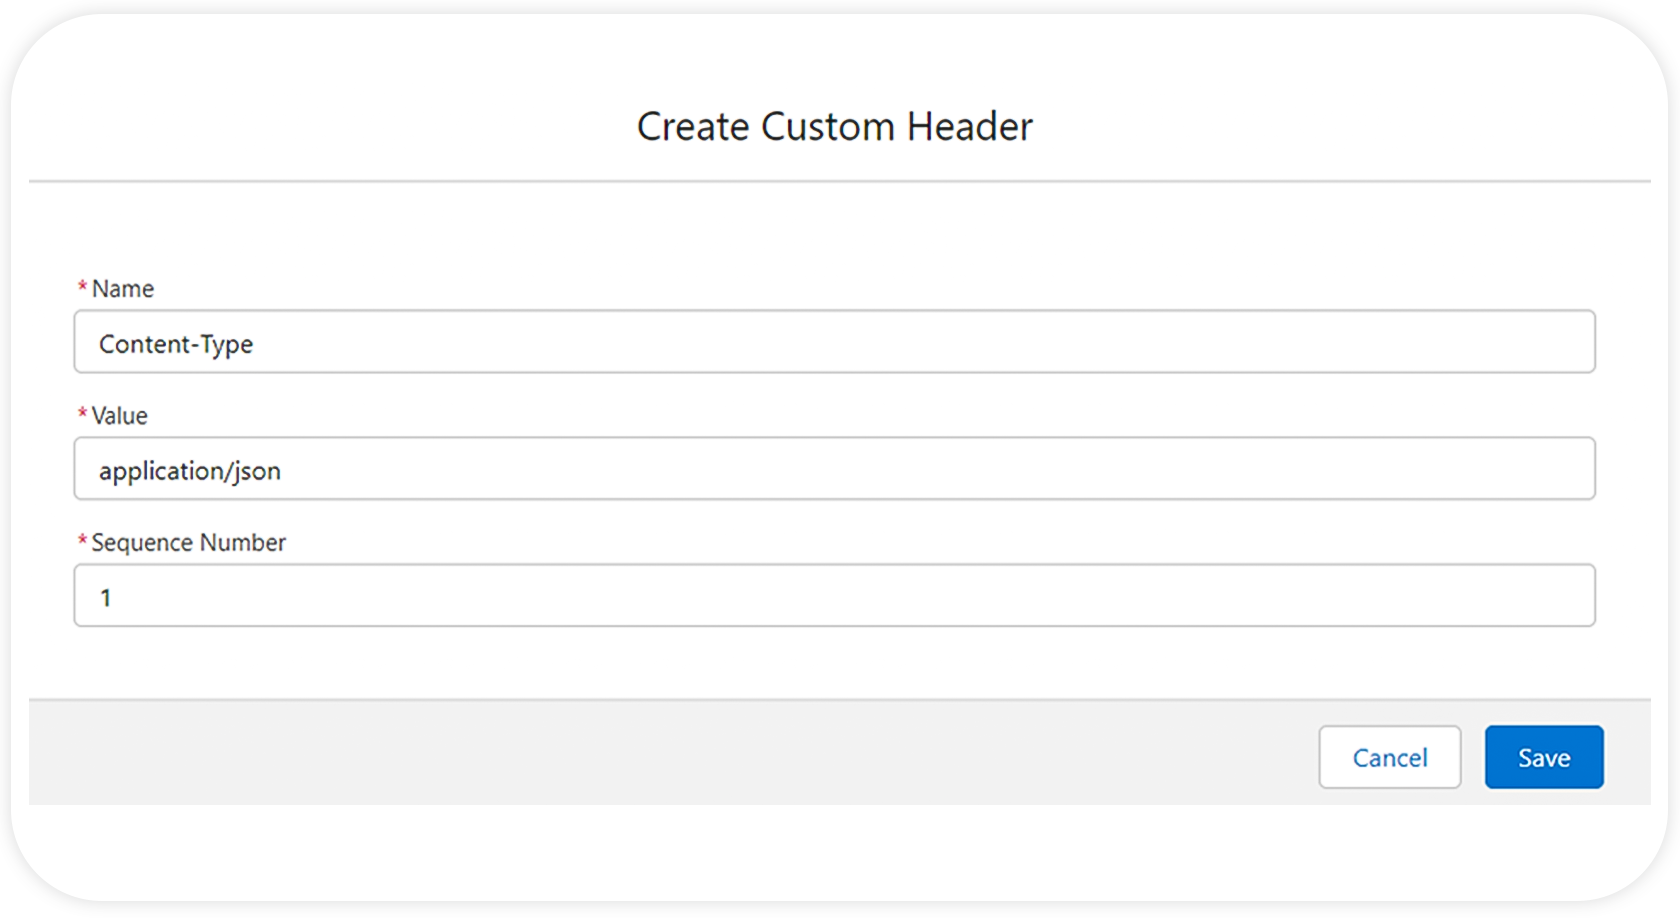
Click Save.
Add external credential principal access to the profile
Go to your profile and add external credential principal access.

Chat Transcript field creation
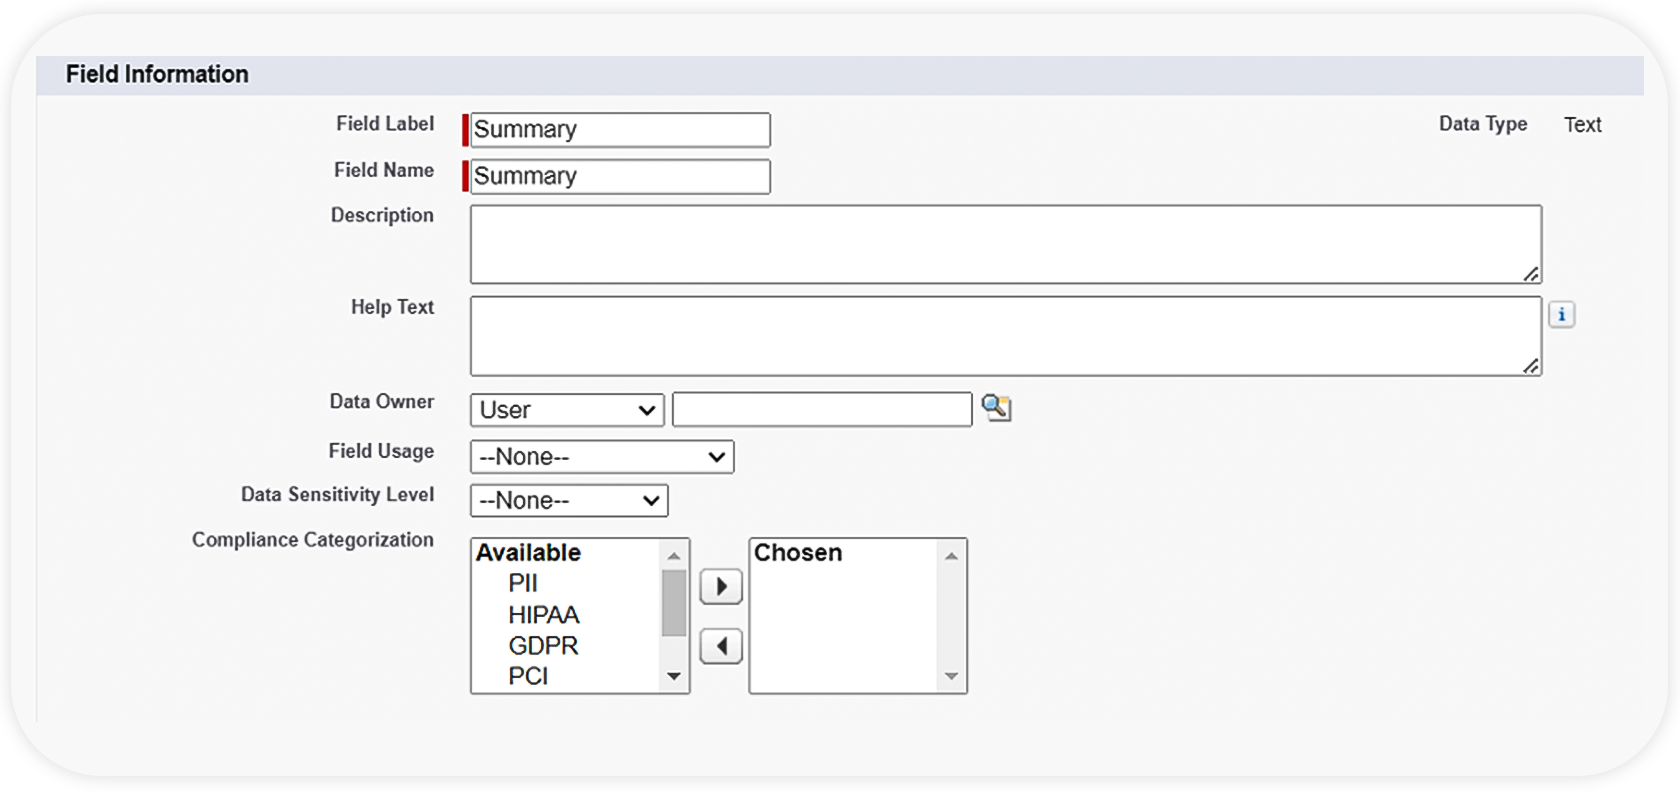
To store main information of a dialogue with a client, we can use a text field specially created for this on the Chat Transcript object.
In the setup Object Manager find the Chat Transcript object, click Fields & Relationships tab and click New button. Select text Data Type, fulfill all necessary fields, choose layout for displaying the field and click Save.
Main logic creation
A chat transcript is a record of a chat between a customer and an agent. Salesforce automatically creates a transcript for each chat session.
Requirements:
After the agent completes the chat, display the main idea of the dialogue in the Summary field (we created it earlier).
!Important! When you’re using Omni-Channel routing, the chat transcript is created when the chat’s requested by a visitor. When a chat ends successfully by a customer or an agent, the chat transcript is updated with Body field as soon as the agent closes the chat window and any related tabs.
Solution:
Let’s create an Apex Trigger for Chat Transcript object.
Let’s create an Apex Trigger for Chat Transcript object.

Then let’s create a trigger handler class.

Since we are using an after update trigger and plan to update the summary field with the Body field, we need to add a check for the Body field to avoid trigger recursion. The Body field should be changed and can’t be blank.
In updateTranscriptSummary() we execute batch with a chunk of 100 records to avoid limits.

Now let’s create an Apex Batch with the main logic.
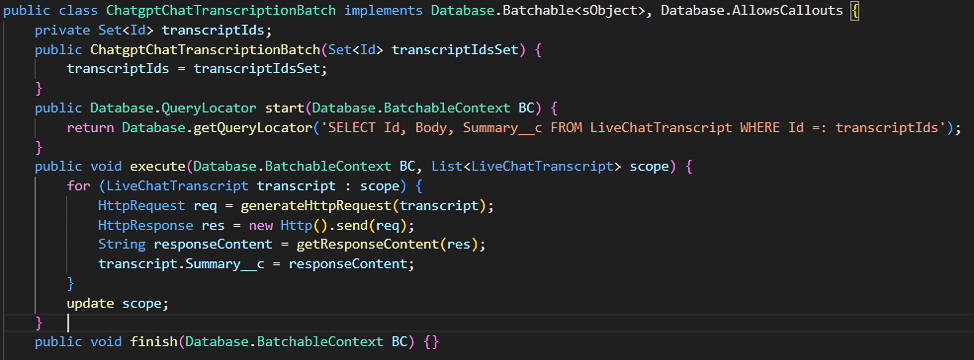
In start() method we receive all LiveChatTranscript records corresponding to the passed Set<Id>.
In execute() method we generate Http request calling the generateHttpRequest() method:
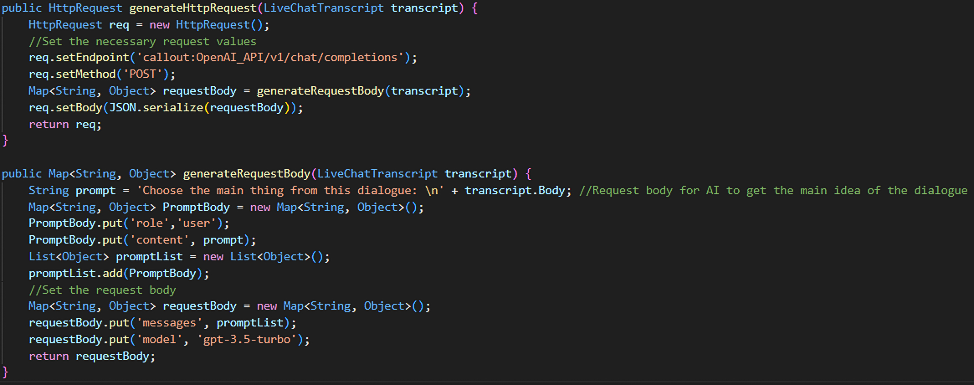
Then we send generated Http request.
Once we get a response, we send it to the getResponseContent() method and receive the response content:
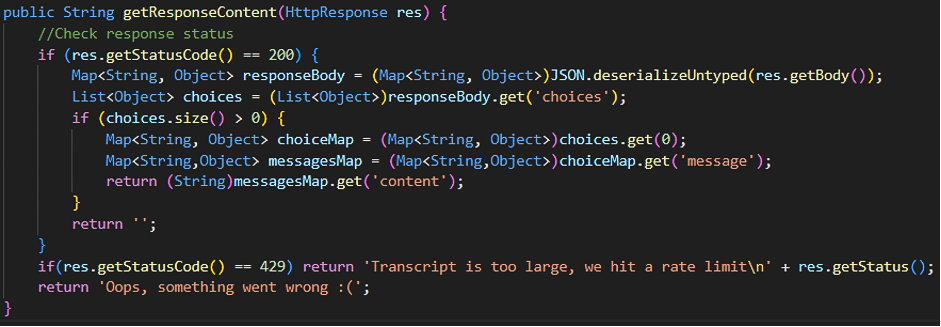
At the end of execute() method we change Summary field for every record and update the list of Chat Transcript object records.
Let’s test our feature.
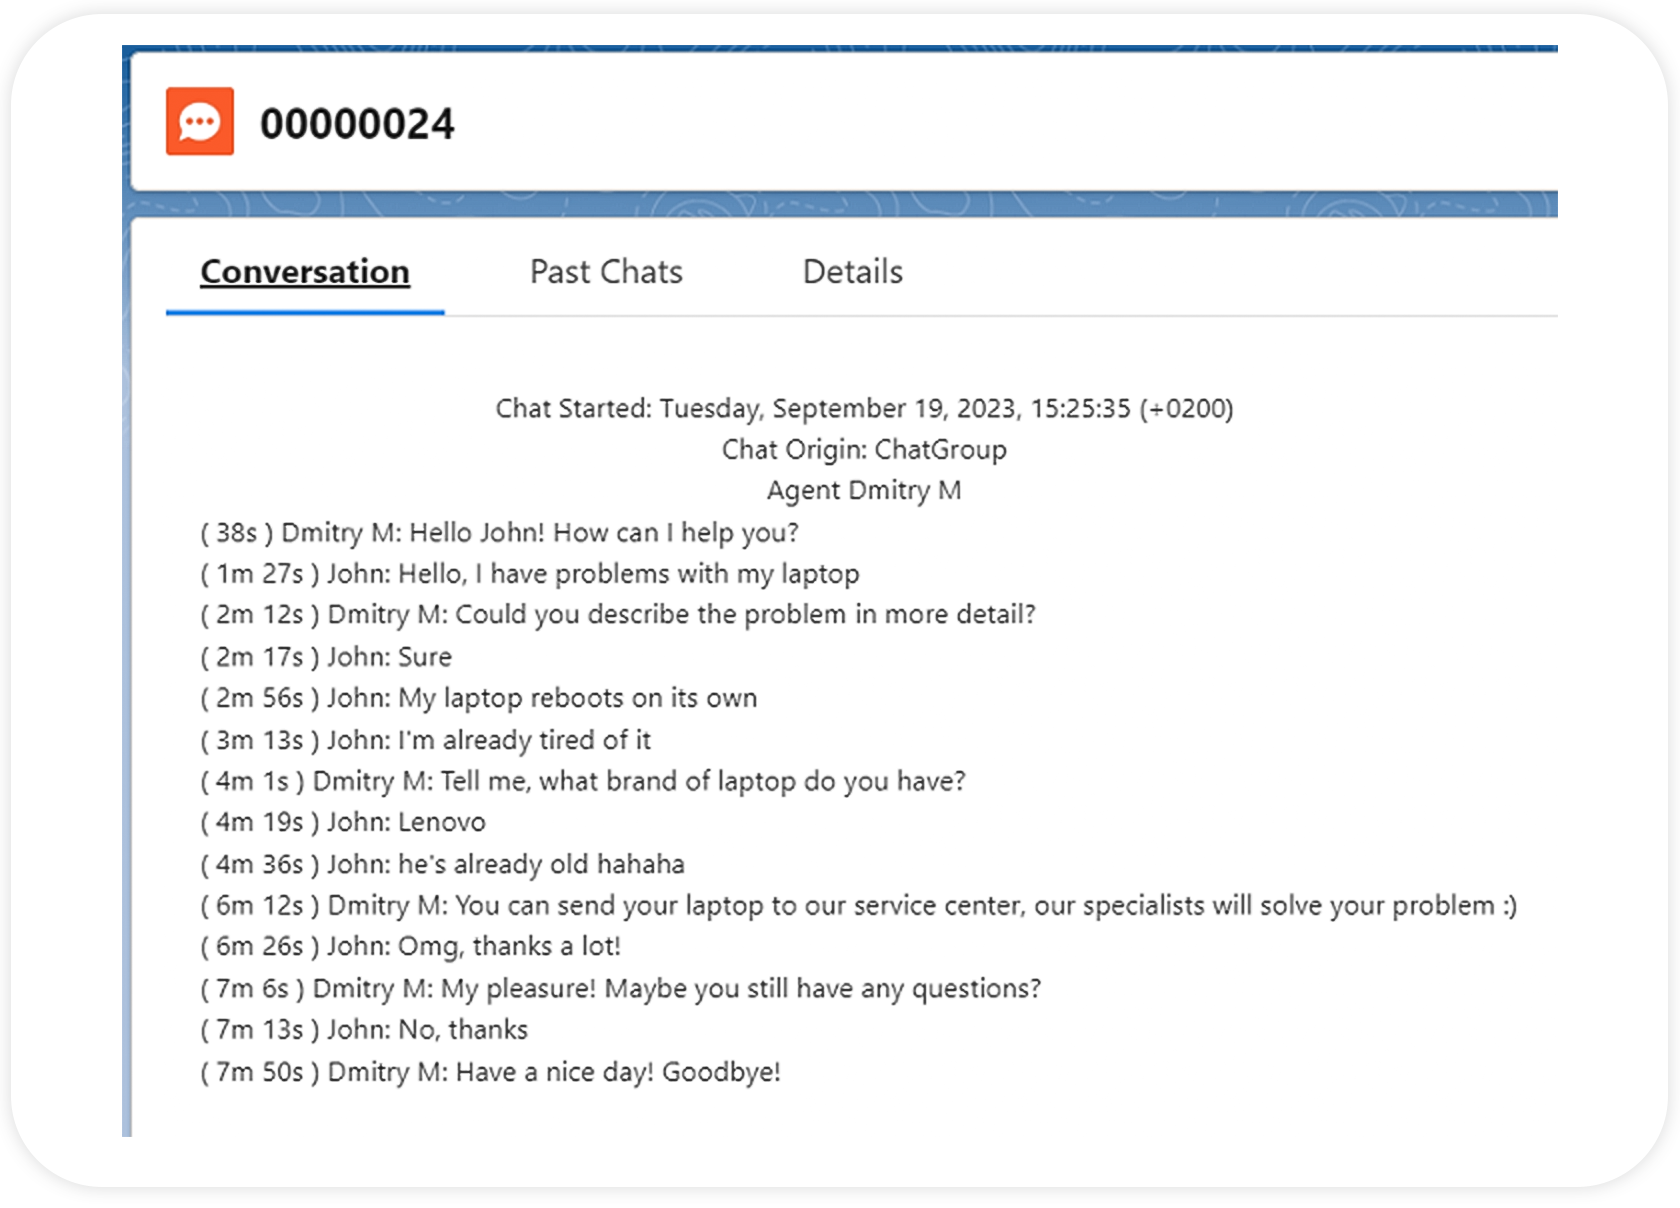
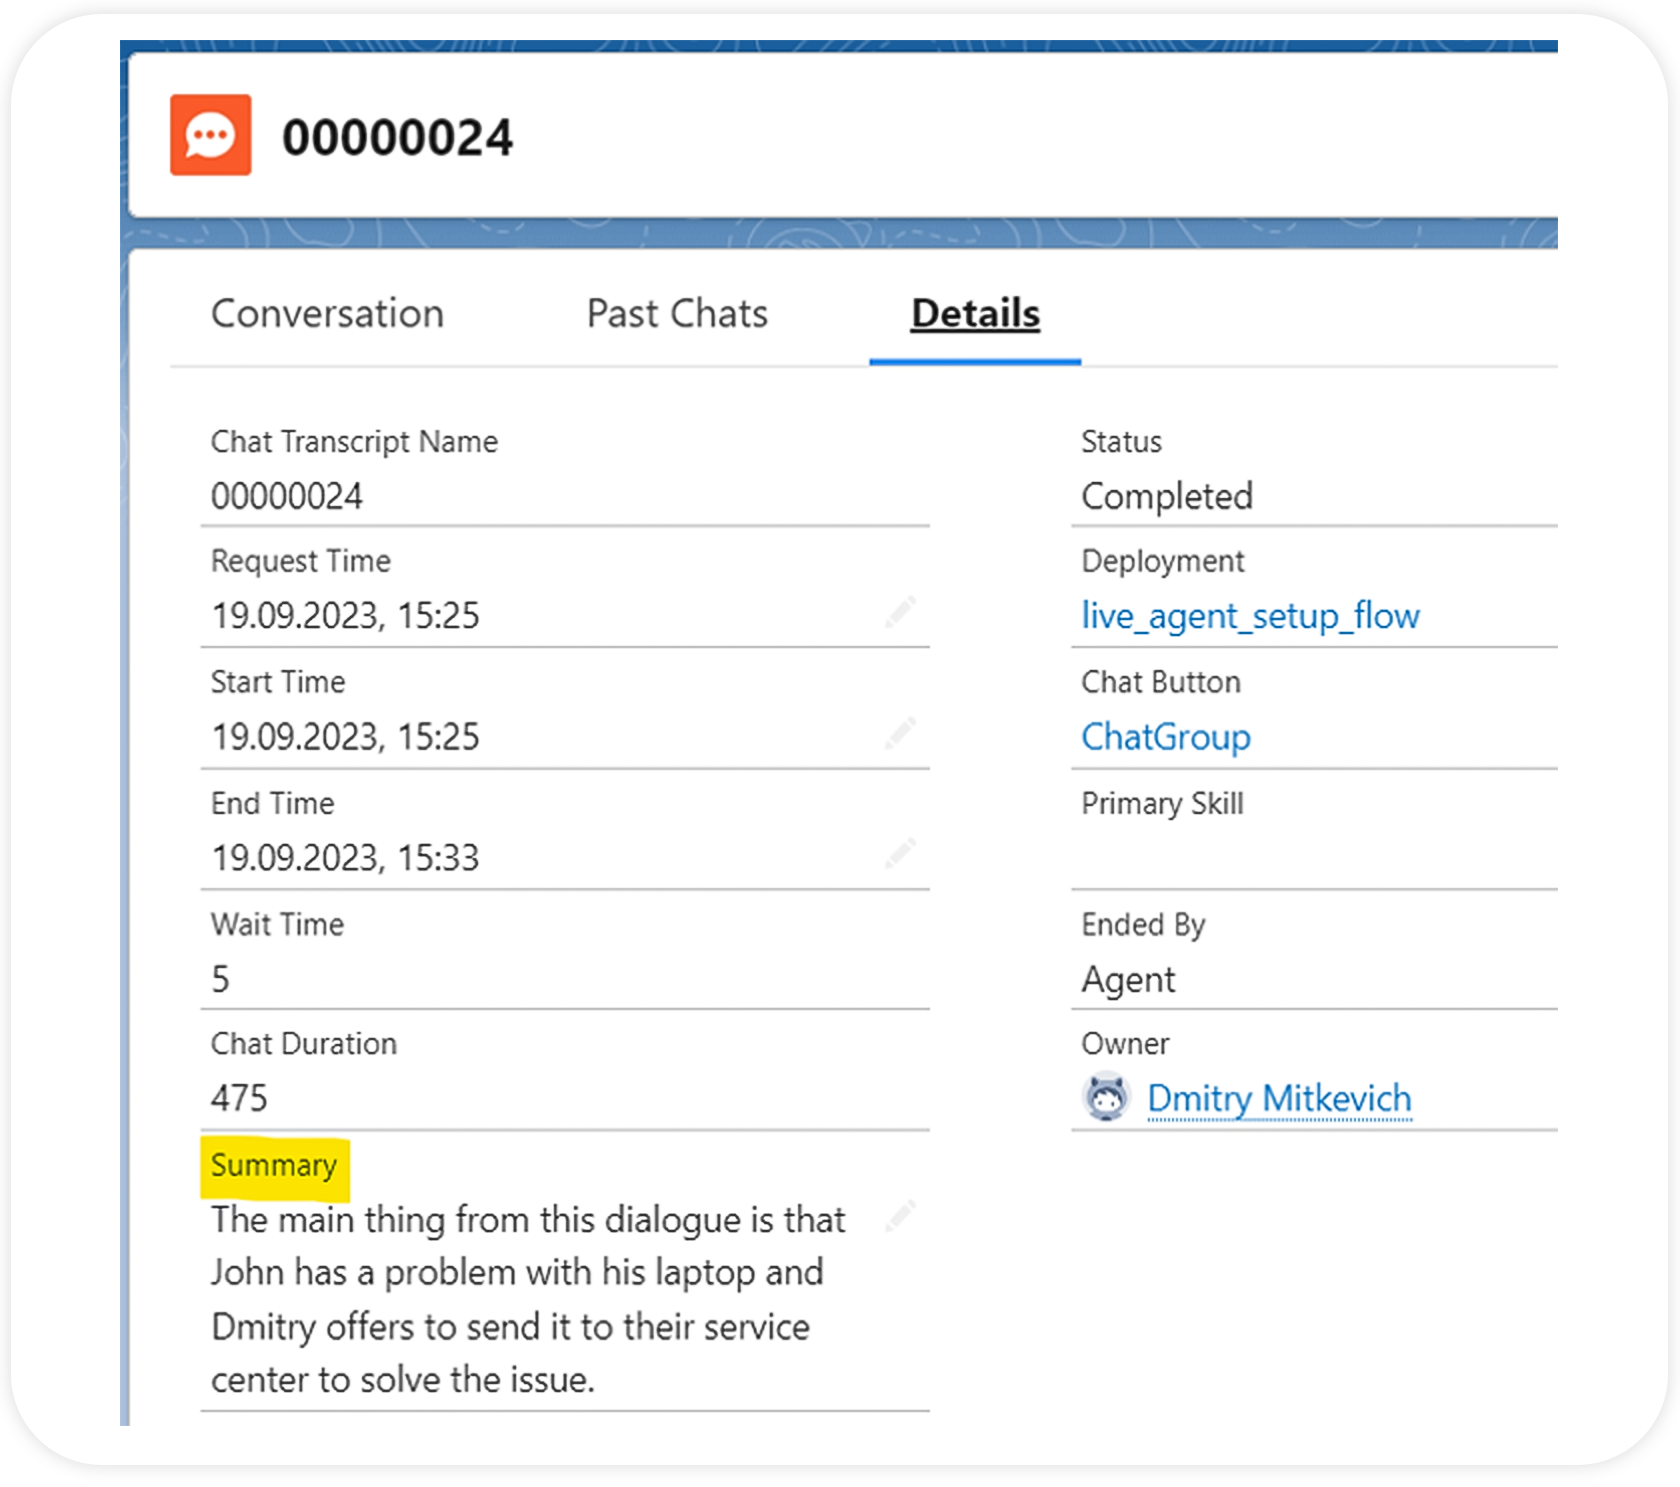
As we can see, with the help of AI we were able to select the most important moments of the dialogue, thereby simplifying the agent’s work.


